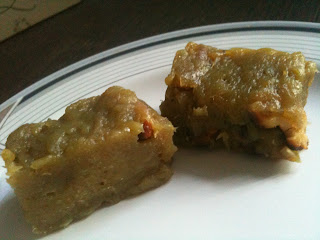
Monday, February 29, 2016

Eggless, Whole wheat Carrot Muffins (Sugar-free)

This takes just 35 minutes end-to-end including grating carrots and preparing the batter to getting the baked goodies out of the oven  :-)

Guilt-free carrot muffins!

Ingredients-

Whole wheat pastry flour - 1 cup
Curd - 1/2 cup
Oil - 1/3 cup
Jaggery - 1/2 to 1 cup depending on how sweet you want it to be since carrots can be sweet themselves
Carrots (grated) - 1 cup
Baking soda - 1 tsp
Baking powder - 1/2 tsp
Vanilla essence - 1 tsp
A pinch of salt

Batter , ready to go into muffin moulds


Method-

Preheat your oven to 180 degrees Celcius.
Grate 1 cup carrots (around 1 medium sized carrot). Sieve the flour and baking soda, baking powder twice. Powder the jaggery or grate it. Take the wet ingredients in a bowl. Whisk the curd well so that there are no lumps. Next add the oil and whisk again. Add the jaggery powder and mix well. Add vanilla essence. Now add the dry ingredients and stir so that there are no lumps. Fold in the grated carrots.  Add a ladleful of batter to the cupcake liners. Bake for 10-15 min till a toothpick inserted comes out clean.

Ready to go into the preheated oven


Enjoy these delicious guilt-free muffins!! 

Tuesday, December 29, 2015

Karuveppilai Podi - Spiced Curry leaves powder - Great accompaniment to rice!

I had bunches of curry leaves getting dried up and sitting in my fridge! Although they're given FOC (free of charge) at Indian grocery stores when you buy a reasonable amount of veggies from them, I didn't want to waste soo much of curry leaves! I really hate wasting food and I have even gobbled down leftovers (when they're too little) in an attempt to not waste food.

This spiced powder can be a great accompaniment to rice, esp on those days when you're in no mood to make sambar/rasam/dal! Just sprinkle some "Karuveppilai podi" and half a teaspoon of Ghee (ahem! Gingely Oil will taste just fine too :-) ) and wow! all you need is a packet of Potato Chips to complete your meal :-)

You Need -


Curry leaves - 1 cup
Urad dal - 2 tbsp
Channa dal - 3 tbsp
Dry Red chillies - 4
Cumin/Jeera - 2 tsp
Salt - as per taste
Oil - 2 tsp

Method -


Ensure that the curry leaves are dry. Ideally, you should begin by washing thoroughly and drying them in paper towels.

Take a pan, pour oil and start frying all the ingredients together. Once a beautiful aroma emanates, you know it's done and you can switch off the fire. Let it cool down before you powder them.

Store in an air-tight container and label it with date.

Home-made Karuveppilai podi

Sunday, December 27, 2015

Orange Cake from freshly squeezed Orange juice - YUM!

This is my go-to recipe whenever I need to bake a cake for guests or a potluck party or an office party. I just sprinkle some powdered sugar on top and serve the cake and have received lots of appreciation for its yummilicious taste! 

It's an easy recipe and more importantly, fail-proof! C'mon, take a look and try it yourself ! I've adapted this recipe to my taste from Chefandherkitchen


Dry ingredients:

1 and 1/4 th cup All purpose flour/ Maida
1 and 1/4 th cup Wheat flour/Chapathi aata
2 tsp Baking Powder
1 tsp baking soda

A pinch of salt


Wet ingredients:

1 can  (400 ml) of Condensed Milk
1/2 cup- melted Butter, at room temperature 

1/2 cup Oil (sunflower oil is what I used)
1 cup - freshly squeezed Orange Juice

5 tbsp Honey or Dates syrup (I've tried with both and got good results)

2 tsp Vanilla Essence 
2 tsp Apple cider Vinegar
 or lemon juice
1 tsp Orange Zest (just grate orange skin with a fine grater, don't skip this - it really enhances the taste)


Freshly squeezed orange juice and real butter this time!

Fresh out of the oven!


Procedure:

1. Take out the butter from the fridge and let it soften at room temperature.
2. Now, start with sifting the flours together with the baking soda, baking powder and salt .
3. Take a big bowl and whisk all the wet ingredients(except orange zest) together and whisk well. 
4. Preheat the oven to 180 degrees Celcius.
5. Now, make a well in the centre of the flour mixture and slowly, add in the wet mixture. 
6. Make sure there are no lumps and it's of uniform texture.
7. Add the orange zest finally and mix gently.
8. Take a baking pan (I used my circular pan) and line with baking sheet.
9. Pour the batter on it and tap well so that it's spread evenly through the pan and there are no air bubbles.
10. Bake at 180 degrees for about 25 minutes. Keep checking after 20th minute. If a toothpick inserted in the center of the pan comes out clean and non-sticky, then the cake is done :-)
11. Switch off the oven and take out the pan after 10 minutes. 
12. Slice into pieces after it has become warmer. Enjoy!!!
Eggless Orange cake


Wednesday, June 3, 2015

Pidi kozhukattai - Best South Indian tiffin ever!


I have a special love for steamed foods, especially the kozhukattai kinds. I was craving to eat some and made this quick pidi kozhukattai as it doesn't require any special ingredients. 

This was our dinner tonight. It took me 20 minutes end-to-end to prepare this. Awesome, isn't it? 


Pidi kozhukattai with Onion thokku and Sambar

Ingredients:


Rice - 1 cup
Coconut - 1/2 cup

Tempering :


Oil - 2 tsp
Mustard -1 tsp
Channa dal - 1 tbsp
Curry leaves - 1 sprig
Green chillies-  3 , finely chopped
Red chilly -1
Asafoetida - 2 dashes
Salt - to taste (~1 tsp)

Method:


Wash and rinse rice as usual. Then take a pan, fry the rice as such (dry).  Stop when it starts becoming slightly reddish. Let cool and grind coarsely to a powder. This is typically called "rice rava".

Take a kadai, heat oil and do the tempering as given above.
Then add water and let boil. Rice rava to water ratio is 1:2.5
Add salt and coconut to the water.
After a minute or two, slowly add the rice rava and keep mixing. Ensure there are no lumps. Keep stirring.  In 2-3 minutes, all the water would have been absorbed. Test if the rice is cooked, if not, do add another 1/4 cup to 1/2 cup water and let it cook well.

Now transfer to a plate and allow it to cool , so you can handle it with your palms to make kozhukattai.

Steam in an idly cooker and switch off flame in 10 minutes exactly. Kozhukkattais are done :-)

Pidi Kozhukattai - South Indian tiffin


Enjoy with Onion Chutney and Sambar :- )

Tuesday, May 26, 2015

Low fat Fruit and Nut Cake ~ Christmas Cake - Butter-free, Eggless cake :-)

Nowadays, I am inclined towards fat-free baking. True, we cannot avoid sugar in cakes, but we can minimize them by adding natural sources of sweetness. What do we do for butter? Substitute with natural sources of fat, that are good for your heart.


Guilt-free Fruit & Nut Cake 


Here's my Low fat Fruit & Nut cake that absolutely delicious and nobody can tell its butter -free or has no plain flour.


I've adapted the recipe from maria's menu but made it healthier by using Avocados and 100% whole wheat flour in place of Maida / All purpose flour/Plain flour. Read on ...

Ingredients:


2 Avocados - ripe (dark green in color)
Whole wheat flour - 1.5 cups
Brown sugar - 1 cup
Dry fruits (like raisins, tutty fruity, apricots, figs, ) +
Nuts (I used chopped almonds and cashews) = totally 1 and 1/2 to 1 and 3/4 cups roughly
Fruit juice (I have tried both Apple juice and Cranberry juice with good success)
Hot milk - 1/4 cup
Yogurt - 1/2 cup
Vanilla essence - 1 tsp

Baking powder - 0.5 tsp
Baking soda- 0.5 tsp
Cardamom powder - 1 tsp
Cinnamon powder - 0.5 tsp
A pinch of salt


Preparation -


  • Soak the dry fruits in the fruit juice overnight.
  • Drain the juice( save it so you can drink later!) and take  the soaked fruits and nuts in a bowl.
  • Coat it with 2 tbsp of flour roughly.


  • Start by pre-heating your oven to 180 degrees.
  • Sieve the flour along with a pinch of salt and baking soda, baking powder --> all dry ingredients. Add cardamom and cinnamon powder.
  • Beat the avocados (pitted) with sugar in a mixie.


  • Add hot milk to yogurt and mix this to the avocado-sugar mixture. Sure, the batter appears curdled at this stage but fret not!
  • Add vanilla essence as well.
  • Slowly mix the sieved flour mixture into the wet batter mixture until well-incorporated. You can add more chopped nuts at the stage. I like to add some walnuts :-)


Batter ready to go into the oven! 

  • Prepare a pan by lining with baking paper. Pour the batter and let the oven do the magic :-)

  • Do check after 20 minutes using a toothpick to see if the cake is done/ nearing doneness. If its too wet, let bake for another 5 to 10 minutes. Adjust timing by checking every 5 to 7 minutes. If the top is brown but the insides are uncooked/wet, then cover with an aluminum foil so that the top doesn't get burnt.


Just out of the oven! Heavenly goodness!

Enjoy your cake guilt-free :-)

This is suitable even for heart patients as there is no butter or oil added.

This year (26th Dec 2015), I made this lovely cake again for a potluck party and it was a big hit!!
Some photos -
Christmas Cake

Shopped for dry fruits and nuts and candied fruits :-)


Saturday, October 18, 2014

Badam Pak / Badam Mysore Pak / Almond Fudge - Easy Diwali Sweet

My husband loves Mysore pak and we always get a kilo from Krishna Sweets during our trip to Chennai. However, I always keep thinking that there's nothing healthy in it but just loads of ghee and sugar and Besan (kadala maavu/ gram flour) which doesn't help much. Last week, when talking to my mami about Diwali preparations, she mentioned that ammamma used to make badam pak often and that everyone loves it. Immediately, I asked her if she has learnt the recipe and jotted it down and planned to try it this Diwali.


Badam Pak / Almond fudge


The ratio is the same as the traditional mysore pak, just that we omit besan (gram flour) completely and use badam (almonds) instead. 


What You Need - 


1 cup badam (almonds)
1 cup water
2 cups sugar
3 cups ghee

Method -

=> I used 1/2 cup badam, 1 cup sugar and 1.5 cups ghee and got around 15 pieces, as you see in the picture.  For your reference, the standard is 1 cup = 240 ml.

  •  Powder almonds (badam) in your mixie. You might have to do it in batches as we need them to be finely powdered. There's no need to soak badam or peel the skin.
  • Prepare a greased tray and keep it ready. I used my oven's tray and placed a baking sheet on it. 
  • Mix all the ingredients in a wide pan and make sure there are no lumps. I used a whisk to do the job. 
  • Put the pan on the gas stove (medium flame) and keep stirring in one direction. This is the painful part as you need to keep stirring continuously for about 12-15 minutes. 
  • After about 8 minutes, you would realize that the mixture is getting thickened. Continue stirring.


  • Around 13th minute, ghee would start leaving the sides of the pan and the mixture would have thickened even further.
  • Now, you can pour the mixture on the tray. Don't level the surface, the best (ideal) result would be porous badam pak. If you had poured it on the plate earlier (before it's done) then the badam pak would be flat (not porous) yet soft.


  • Wait for another 15 minutes for it to cool down and then cut into squares. 

  • Store in an airtight container. This stays good at room temperature for 7-10 days. 
  • Enjoy the rich badam sweet!! 

Badam Mysore Pak


Notes: 

  • There was a lot of ghee  (about 8-10 spoons) that separated and I managed to collect them in a bottle, one spoon at a time, from the tray. The rest of the ghee that was on the tray, was used to roll out doodh pedas that I had made. 
  • Also, I used the kitchen tissues (paper) to wipe/drain excess ghee from the pieces.
  •  Timings would vary if you double or triple the quantities I used. You would have to wait and watch for the signs like, mixture thickening up and ghee separating. 


Butter Murukku without much butter - Crunchy on the outside, melts in your mouth

The secret is to use cooked moong dal. No roasting, no grinding - it's so quick and your mullu murukkus turn out to be crispy yet melt-in-your-mouth kind. 

Butter thenkuzhal


I Used -

  • Rice flour -  1 and 1/4 cups
  • Moong dhal - 1/2 cup (measured after cooking the dal)
  • Butter - 1-2 tbsp
  • Sesame seeds - 1 tsp
  • Cumin Seeds - 2 tsp
  • Salt - as required (start with 3/4 tsp and taste the dough and adjust)
  • Hing - 1/2 tsp
  • Red chilli powder - 1/2 tsp
  • Black pepper powder - 1/2 tsp
  • Hot oil - for frying

Method -

  • Cook moong dal until mushy (Best to pressure-cook. I use 2 and 1/2 times water for 1 cup moong dal). 
  • Mix with rice flour, add in the other ingredients like sesame seeds, cumin, red chilli powder, salt, pepper powder and a pinch of asafoetida and finally just 1-2 tbsp of butter. 
  • Make a soft dough by adding a little water at a time. 
  • Add hot oil to make the dough smooth so that it doesn't stick to your hands or the murukku mould. Just be careful not to hurt your fingers. 
  • We're almost there, the rest of the process is mundane. Use the murukku press (you can use the Single star mould for making proper circles and 3 star one for making random shaped mullu murukku) and deep-fry murukkus into hot oil on medium flame until golden brown. 
  • Drain on kitchen tissues to remove excess oil. 
  • Store in air tight containers after 30 minutes and enjoy :-) 
Happy Deepavali 2014 everyone! 

Friday, November 1, 2013

Chocolate Laddu ~ Diwali Mithai with a Twist ~ Nutritious Ladoo for Kids

In a nutshell, this is what I did - Made a laddu from "Health mix powder" and coated it with melted chocolate. I added some more cashews and roasted gram/fried gram/ pottukadalai to the health mix powder which is predominantly Ragi! Nobody really loves Ragi/Millet so if you have to sell something with Ragi, it better have something inviting, and what's better than chocolate!!!

CHOCOLATE LADDU/LADOO

Kids would throng to it because of the outer choco covering and moms are happy because you know the secret ingredients - millet (ragi), corn, barley, wheat, cashews, roasted gram (pottu kadalai) and much more!


Let me get to the specifics quickly -

I Used -

Manna Health Mix powder

Ingredients of the Health mix powder


Manna Health Mix powder - 1 cup (You can also make your own kanji maavi/ sathu maavu or use any other commercially available brands)
Cashews - 1/2 cup
Roasted gram/ Fried gram / Pottukadalai/ Dalia - 1/2 cup

Sugar - 1 1/2 to 2 cups
Water - to cover the sugar
Cardamom powder - a generous pinch
Ghee - 1 tsp + 1 tsp

Semi sweet chocolate/Dark chocolate - 100 g

How To -


Roast the health mix powder (sathu maavu mix) with a tsp of ghee for about 3-5 minutes on a pan.


In the mixer, make a fine powder of the cashews + fried gram (pottukadalai). I used my Indian mixie.


Mix 1 and 2 powders.

Heat a pan and add water and sugar. Add cardamom powder as well. When it reaches a certain consistency and you can see bubbles rising up for 2-3 minutes, it’s ready.  Switch off the stove. It's ok if you want to wait a few minutes for the syrup to cool down.

Take a big bowl and add the sugar syrup slowly to the powders (roasted health mix powder + cashew nut + pottukadalai powder).

First it forms some lumps. Keep adding some more sugar syrup until it all comes together into a sticky mass and you can easily form laddus. Ensure that the sugar syrup is evenly incorporated into the powders. Use gloves to do this whole process of mixing.


Apply melted ghee (the other 1 tsp; use a little for every 5 laddus) on your palms and make small laddus/balls.

   Tip : You can taste at this stage (before making laddus) to check if the sweetness level is sufficient. If too sweet, just add a little more Health mix powder and mix. If not sweet enough, then add more sugar syrup.

Healthy Laddus before coating with chocolate


 Coat the balls with slightly melted chocolate OR grated chocolate (according to the looks n texture you prefer). I melted the chocolate in a microwave for 2 minutes.


Immediately After Coating with Melted Chocolate
Keep the chocolate laddus in the fridge for atleast an hour so it doesnt stick to your hands anymore.

Chocolate Laddu/ Laddoo ready to eat!


Your nutritious chocolate laddoos are ready to be devoured! :-)


Sunday, October 27, 2013

Top 10 Diwali Recipes - Easy Deepavali Sweets and Savories


Here are some Easy Diwali recipes from what I've tried in my kitchen:

The sweets take under 20 minutes, I promise!


No bake brownies!


Easy Peda with Jamun mix!!

               Only 3 major ingredients required! Beginner Recipe!
MaaLaddu - Beginners' sweet

                 Totally addictive Halwa from Palakkad, Kerala.

Vaazhaipazha Halwa

Badam Laddu - no Ghee, no sugar!


                     Foolproof method - Authentic taste without all the sweating

Pal Kova in microwave in just 10 minutes!

                     Rich taste from Dates and Figs yet very low in calories! A great way to make your family   consume some nuts and dry fruits

Little hearts made from rich dry-fruits and healthy oats

  • Chocolate Laddu - an innovative sweet with healthy ingredients. Kids and adults alike will love anything that has chocolate, isn't it? 
Chocolate Ladoo! Yay!!


SNACKS / KAARAM:
 
Thattai

  • Mullu Murukku or Thenguzhal
    Mullu Murukku is our favorite snack, just like every other fried crunchy stuff that we'd love to munch:) It's popularly known as  'murukku' in Singapore and Malaysia. Makes a perfect Diwali item!
Thenkuzhal


Chivda mixture


So, What are you making this Diwali?

LinkWithin

Related Posts Plugin for WordPress, Blogger...