Hello friends! Today's post is gonna be about a recipe which really boosted up my confidence that I can cook well too, back in the days I began experimenting in the kitchen. I thought it's definitely a nice idea to share it with everybody and I hope this will motivate novice cooks to succeed.
A picture speaks a thousand words! This is going to be a pictorial with lesser noise from me! :)
Oil/ Ghee/ Butter (or a combination)- 1 and 1/2 tsp
Omam / Ajwain/ Carom seeds - 1/2 tsp
Onion - 1 (chopped)
Ginger+Garlic paste - 1 tsp
Green chillies - 4
Potatoes - 2
Coriander-cumin powder (Dhania-Jeera) - 1 and 1/2 tsp
Turmeric - 1/2 tsp (or slightly less)
Kitchen king masala - 3/4 tsp (optional)
Salt - to taste
Fresh Fenugreek leaves (Methi) - 1 cup (loosely packed)
Wheat flour - 4 cups
Warm water - 1/2 cup
Yogurt /Curd - 4 tbsp
Salt - to taste
Oil - 1 tsp
1. The two parathas that make up a stuffed paratha should be ~ of the same shape. It is likely that you'll get (more or less) the same shape if you start with the same quantity of dough for both.
2. This method applies for any stuffing - Paneer parathas, Cabbage parathas, Broccoli parathas and virtually anything you can imagine.
3. You need to let the prepared stuffing to cool sufficiently, before rolling parathas. When hot, they stick too much and could get messy!
Although this method yields delicious parathas, some folks like their Alu Parathas better if they get to see some stuffing visible on the paratha itself. Now, this is a challenge (atleast to begin with) as you should show some filling but still cover it all up with a thin layer of dough. Here comes the


This pic / step is the key. You can see that the filling is placed right at the beginning of the rolling process, when the paratha is still relatively thicker. Also, you make folds on the dough while trying to cover up the filling. This ensures there is sufficient dough to sorta protect the filling from spilling out of the covering when you roll it out.

Cook the parathas on a hot tawa, as we do with any other paratha (please refer to Sweet potato paratha, Methi paratha for the detailed procedure and some tips). Finish off with a drop of ghee!
When you compare the 2 methods(see pictures of both above), the first one (beginners' method) allows you to insert more filling per paratha. This is useful if you have a fussy child (or spouse;) who promises to go by the numbers and eat exactly 1 or 2 parathas only ! You can be assured they had a filling meal as you have stuffed a 'generous' portion of potatoes, which is full of carbs! You can also roll out a bigger circle to increase the quantity of intake but that's a very obvious change :)
Since the filling has all the required spice and salt content, this can be had as such and is ideal to be taken to your workplace (like a wrap) too. I try to buy a single-serve pack of flavored yogurt (preferably mixed berries) and give a finishing touch to my meal. When at home, I eat with raita (beaten yogurt with chopped onions and tomatoes spiced with salt and asafoetida)!
A picture speaks a thousand words! This is going to be a pictorial with lesser noise from me! :)
 |
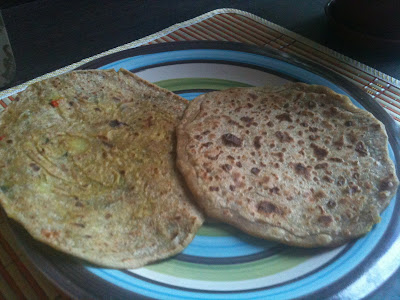
| Potato-stuffed Parathas |
Yield - 8 Stuffed Parathas
What I Used -
For the filling -
Oil/ Ghee/ Butter (or a combination)- 1 and 1/2 tsp
Omam / Ajwain/ Carom seeds - 1/2 tsp
Onion - 1 (chopped)
Ginger+Garlic paste - 1 tsp
Green chillies - 4
Potatoes - 2
Coriander-cumin powder (Dhania-Jeera) - 1 and 1/2 tsp
Turmeric - 1/2 tsp (or slightly less)
Kitchen king masala - 3/4 tsp (optional)
Salt - to taste
Fresh Fenugreek leaves (Methi) - 1 cup (loosely packed)
For the paratha dough -
Wheat flour - 4 cups
Warm water - 1/2 cup
Yogurt /Curd - 4 tbsp
Salt - to taste
Oil - 1 tsp
How To-
 |
| Paratha Dough - soft and pliable |
- I start with the dough so that it rests for a while and the filling gets made in the mean time.
- Take a big mixing bowl, measure and add wheat flour (actually one gets a sense of the quantity by practice and if it happens to be in excess, you can always wrap the remaining dough in cling film and refrigerate to be used the next day).
- Add salt and slowly pour warm water and start mixing the dough. When they have slightly come together, add yogurt and knead well. Yogurt helps to give softness to the parata. Knead well for about 3-5 minutes and finally add oil and get a smooth dough.
- Cover the bowl with a lid and let rest for about 30 minutes.
Let's make the filling now. As usual, I have listed the ingredients in the order they go into the recipe.
Finally, I added Fenugreek / Methi leaves because I had them in the fridge and wanted to use them while they were still fresh. For traditional Aloo Parathas, it's really nice to add some fresh coriander leaves/ cilantro.
Now to the most important part of stuffing the parathas and rolling them beautifully ...


 |
| Heat oil in a pan/kadai, add carom seeds then fry onions |
 |
| Add ginger-garlic paste, fry for 2 mins, then green chillies (Oops! I used Red Chilli Padi that I had on hand) |
 |
| Cook 2 potatoes in a pan with sufficient water and salt |
 |
| Peel cooked potatoes and mash them |
 |
| Add mashed potatoes to the pan, add the spice powders + salt |
 |
| Mix well till everything comes together... |
 |
| Stuffing for Alu Parathas |
Finally, I added Fenugreek / Methi leaves because I had them in the fridge and wanted to use them while they were still fresh. For traditional Aloo Parathas, it's really nice to add some fresh coriander leaves/ cilantro.
Now to the most important part of stuffing the parathas and rolling them beautifully ...


The secret to getting stuffed parathas right, is now out!
- Take a small lemon-sized dough, roll it into a rather thin paratha (using a rolling pin).
- Take some filling and spread it evenly (without bumps) on the rolled out paratha with a spoon.
- Roll out another plain paratha and place it on top of the first one that already has the filling spread on its surface.
- Once the two are super-imposed almost perfectly, seal the edges by tucking them and pressing them with your fingers. The dough being soft with stick to each other, just like that (Attraction of like molecules)!
Notes:
1. The two parathas that make up a stuffed paratha should be ~ of the same shape. It is likely that you'll get (more or less) the same shape if you start with the same quantity of dough for both.
2. This method applies for any stuffing - Paneer parathas, Cabbage parathas, Broccoli parathas and virtually anything you can imagine.
3. You need to let the prepared stuffing to cool sufficiently, before rolling parathas. When hot, they stick too much and could get messy!
Secret #2
Any Stuffed paratha remains softer longer (and tastes a lottt better) than a plain paratha, even when prepared by someone inexperienced with the tricks of kneading a soft dough!Although this method yields delicious parathas, some folks like their Alu Parathas better if they get to see some stuffing visible on the paratha itself. Now, this is a challenge (atleast to begin with) as you should show some filling but still cover it all up with a thin layer of dough. Here comes the
Traditional method -


This pic / step is the key. You can see that the filling is placed right at the beginning of the rolling process, when the paratha is still relatively thicker. Also, you make folds on the dough while trying to cover up the filling. This ensures there is sufficient dough to sorta protect the filling from spilling out of the covering when you roll it out.

Cook the parathas on a hot tawa, as we do with any other paratha (please refer to Sweet potato paratha, Methi paratha for the detailed procedure and some tips). Finish off with a drop of ghee!

When you compare the 2 methods(see pictures of both above), the first one (beginners' method) allows you to insert more filling per paratha. This is useful if you have a fussy child (or spouse;) who promises to go by the numbers and eat exactly 1 or 2 parathas only ! You can be assured they had a filling meal as you have stuffed a 'generous' portion of potatoes, which is full of carbs! You can also roll out a bigger circle to increase the quantity of intake but that's a very obvious change :)
 |
| Super-imposed parathas (Beginner method) - torn to reveal the filling inside! |
Since the filling has all the required spice and salt content, this can be had as such and is ideal to be taken to your workplace (like a wrap) too. I try to buy a single-serve pack of flavored yogurt (preferably mixed berries) and give a finishing touch to my meal. When at home, I eat with raita (beaten yogurt with chopped onions and tomatoes spiced with salt and asafoetida)!
Paratha looks superb... I love this but shy away because of thehardwork of making them..
ReplyDeleteYour method looks easy... should give it a try sometime..
Thanks for sharing dear..
Reva
paratha looks perfect with yummy stuffing...well explained n loved all your clicks!!
ReplyDeleteSpicy Treats
Ongoing Event : Bake Fest # 2
Do participate in My 300th Post Giveaway
Yummy paratha & well explained.,actually I want to start cooking home made paratha,I always use frozen paratha for the easiness....
ReplyDeleteWOW! Maybe easy for you; looks perfect!
ReplyDeleteRita
thank you.. for letting the secret out :) i always worry about the filling getting out of the dough..
ReplyDelete