Sunday, February 27, 2011

Easy Vegetable Chutney (Dipping Sauce)

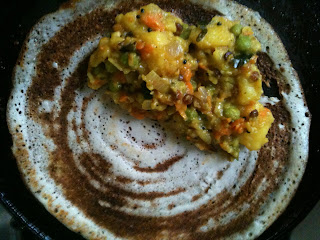
Chutney is one kind of spicy sauce that's used as a dip with Indian snacks. Fret not if your stock of coconut or coriander leaves or pudina leaves is low when you want to make a chutney! When I had been to India recently, I watched my mom use carrots and beans to make a chutney. It's very easy to make and it tastes ABSOLUTELY YUMMY! This mixed vegetable chutney goes well with idli, dosai, vadai and you can also use it as a sandwich spread! :)

Difficulty Level - Easiest
Time (All-inclusive) - 10 minutes

What You Need -


Onions - 1 big
Tomatoes - 2 small/medium
One or more of Vegetables like carrots, beans, cauliflower, broccoli, brinjal, etc - 1 cup
Green chillies - 3 nos.
Salt - to taste
Oil - 2 tsp
Mustard seeds - for tadka/tempering

How To -


  • Heat 1 tsp oil in a pan, add slit green chillies, cubed onions, tomatoes and vegetables, in that order. Don't bother to chop the veggies fine as we're gonna make it into a paste.
  • Add Salt and Fry for about 5 minutes till the raw smell goes away. 

  • Allow it to cool, then blend to a fine paste adding very little water.
  • Temper with mustard seeds.
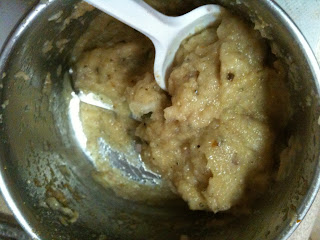
Vegetable Chutney

You can spice it up with minced ginger and garlic, but the whole focus of this recipe was to keep it simple and yet, prepare a tasty chutney with as little ingredients as possible.  Try it for yourself and let me know how you like it!

This is my entry to Condiment Mela hosted by Srivalli

Masal Vadai (Paruppu Vadai / Aama vadai / Dal vada) - Step-by-Step Recipe

Any festive feast in South India is incomplete without Vadai. It also makes a great evening tiffin with coffee/tea, especially on a chilly, rainy day! Paruppu Vadai, as the name says, is packed with the protein power of dals(lentils) of various types. We transform it into Masal vadai by adding onions and some spice powders. I find it yummier than the traditional ulundu vadai because masal vadai is crispier and at the same time, so filling!


Here is a step-by-step demonstration of how I make Masal Vadais. It is very simple and can be made in 45 minutes.

Ingredients:

Basics for Paruppu Vadai -

Channa Dal (kadala pruppu) - 80 g
Urad dal (ulundu) - 50 g
Toor dal (thuvaram paruppu) - 50 g
Moong dal (pasi paruppu) - 50 g

Green chillies - 4
Curry leaves - a few
Ginger - 1" piece
Salt - to taste
Baking soda - a pinch (optional)
Rice flour - 2 tsp - for crispness
Besan (kadala maavu) - 4 tsp - for binding everything together

Oil - for frying

Add-ons for Masal Vadai

Chopped onions - 1 cup
Jeera - 2 tsp
Cinnamon powder - 1/2 tsp
Fennel powder (Sombu powdered) -1/2 tsp
Pepper powder from 8 corns
Cilantro (for fragrance )- optional

Method:

  • Wash and rinse the dals thrice. Soak them together in water for 30-45 minutes.
  • Drain off the water completely. Keeping a handful aside, grind the rest of them into a semi-coarse (semi-fine) paste, like this. Add salt and ginger while grinding. You can choose to grind the green chillies as well, if you don't want them to be seen.


  • Add chopped onions, curry leaves, baking soda, jeera, cinnamon powder, fennel powder, pepper powder. Don't worry if you're out of stock on any of these spices.


  • Mix everything together and add rice flour and besan at this point.


  • Make patties in your hand. They can be 4 cm in diameter and 1" thickness.

  • Heat oil in a deep pan. Do not go until it smokes. Keep flame on 'Low-Medium'. This allows the lentils to get well-cooked inside. Gently, slip in the patties into the hot oil.

  • Flip sides, once the vadais turn golden-color.
  • Once done on both sides, drain them from oil using a straining laddle (preferably stainless steel) and transfer the hot vadais to a plate lined with kitchen roll (paper towel).

Tip:  You can also add shredded carrots to the mixture and call it "vegetable vadai"  :)

Saturday, February 26, 2011

Paneer Butter Masala - Quick & Tasty + Restaurant ki Swad

We all love paneer :) Paneer by itself is yummy and you can make your food even more delectable by adding stuff like tomatoes, onions and spices. I can't imagine how boring Indian vegetarian cuisine would have been, had paneer not been invented! Paneer is a type of cottage cheese of Indian origin. You can make delicious kurmas/curries with paneer or make Paneer Biriyani with rice.

Whenever I want to whip up a quick yet delicious meal (and I mean 15 minutes!) on a lazy Saturday afternoon, I end up making Jeera rice or Garlic rice and Paneer Butter masala. I would like to share with you, this really quick recipe for Paneer Butter masala that tastes just like the one you get in restaurants. Yes, bilkul asli taste :)

I have passed on this recipe to a my family and friends (which in turn, has been spreading like viral!) and everyone who tried it has absolutely loved it! :)

Paneer-Butter Masala Restaurant-Style!


You Need -


Paneer - 20 cubes of 1 cm (You can find cubed Paneer in the Indian grocery stores in the Frozen section)
Butter - 1 tbsp
Fried Onions - 3 tbsp (optional, for added crunch)
Onions (chopped) - 1/2 cup
Ginger-Garlic paste - 1 tsp
Tomato puree - 3 tbsp OR Tomato paste - 2 tsp
Dhania powder (Powdered Coriander seeds) - 1 tsp
Garam masala -1/2 tsp
Red chilli powder - 3/4 tsp
Kasuri methi - 1/2 tsp
10 Cashews soaked in 3 tbsp hot milk -> Make a paste of this and use
Salt - to taste
Milk - 4 tbsp
Cream - 2 tbsp (minimum)

Steps -


  • Take a bowl, mix together the spice powders - dhania, chilli powder, garam masala and kasuri methi. Then add tomato paste and mix everything together adding water little by little. Alternatively, you may add tomato puree, but note that paste is more concentrated and should be used in lesser quantity than puree, as specified. Add the cashew paste too. Finally, add milk to this mixture. Whisk everything in the bowl together. 
  • Now, add paneer cubes into the mixture in the bowl, let it coat every piece and let the paneer marinate for about 30 to 45 minutes atleast. This marination step is cruical, more so if you're using Tofu.
  • After 45 minutes, Take a pan, Melt butter , add ginger-garlic paste and fry for 2  minutes.
  • Fry freshly chopped onions for a while and then optionally, add fried onions for a crunchy effect.


  • Pour the marinated mixture into the pan and cover for 5 minutes.You may add a little water (100 ml) as well and let it all boil together.
  • Add salt.
  • Keep flame on "Sim/Low".
  • After 5 minutes, add cream finally, mix well and switch off after 2 minutes. Garnish with coriander leaves, if you like :)
Wasn't that quick 'n easy?
Paneer-Butter Masala in 15 minutes!

Serve with roti /chapathi /phulka /naan or any Pulao rice :)

Note:  

Cream is the secret to that perfect restaurant-style taste. I have tried Nestle, Amul as well as Bulla Thickened cream and they are all good. Feel free to use fresh cream, if you have the time and patience to prepare it at home. You'll need full-cream milk (milk with atleast 6% fat) to extract cream.

Tip:  

If you do not have paneer at home and can't travel to your Indian store, just substitute it with Tofu, if its easier to find Tofu. It then becomes Tofu-butter masala, of course! While using Tofu, I suggest marinating tofu cubes with the bowl of spices + tomato paste + cream added. About 20 minutes would do. For those who are suspicious about Tofu's taste (and don't believe me!!!), use 50% paneer and 50% tofu and try for yourself! :)


Kiwi Lassi (Indian Yoghurt Drink)

I was surprised to learn from my Chinese/Singaporean/Indonesian friends that, outside the Indian community, it is not a common practice to make curd/yoghurt at home. The concept of consuming curd with rice drives them crazy as yoghurt is viewed as a dessert! For many, yoghurt is a luxury because a litre of yoghurt costs about S$6-7, so it's not an everyday item. For those who are wondering how to make plain yoghurt at home without the lactic acid bacteria, here's a one-line recipe: Microwave 2 cups of full-cream milk for 4 minutes, stir in 1 tbsp of store-bought yoghurt and do not disturb it for 8-10 hours. Voila! Your home-made yoghurt is ready! :) Remember to refrigerate after 10 hours so that it doesn't turn sour.

That's about yoghurt, now, what's lassi? Lassi is a blended smoothie of milk and yoghurt with sugar and a little salt. We can mix in the pulp of fruits like Mango, Strawberry or Kiwi  to make fruit-flavoured lassi. This is a super-easy recipe that can be made in minutes and enjoyed fresh at home, so you don't have to wait for your next trip to the Indian restaurant in your town.

So, what made me make Kiwi Lassi instead of Mango Lassi? I discovered Kiwi recently and not only does it taste awesome but also contains a high amount of Vitamin C (more than orange), as much potassium as bananas and a good amount of Beta-carotene. And I didn't make up Kiwi lassi on my own ...We had been to Sentosa a few weeks back and dined at Samunder, an Indian restaurant and I chose to go with Kiwi lassi, in lieu of Mango lassi, for a change. The combination was fantastic and I wanted to try it again, hence this attempt!

What You Need:

Kiwi fruits - 2
Milk - 150 ml
Yoghurt - 150 ml
Sugar - 4 tsp
Salt - a pinch
Cardamom powder -1/4 tsp
Crushed Ice (optional)


3 Steps to Kiwi Lassi:

  1. First, get the pulp of kiwis using a hand blender or an Indian mixie.
  2. Combine the rest of the ingredients together and blend together to a smoothie consistency. 
  3. You can add some water if it is too pasty/thick. I needed to add water as I had to avoid ice to protect my sore throat.
 Pour into glasses and enjoy!


Thursday, February 24, 2011

Stuffed Brinjal/Eggplant

Research shows that eggplant can have anti-aging effect, help relieve constipation and lower cholesterol. Brinjal also contains good amounts of fiber and potassium. There are varieties of eggplants - purple, green, long, round, fat and different dishes can be prepared with each one.

This recipe is quite dry in texture and makes a great accompaniment with rasam/sambar with rice. The filling/stuffing can be coconut, garam masala spices, onions or anything you like but this heritage recipe, passed on from my ammamma to my amma and chithis uses lentils like channa dal and urad dal with coriander seeds, red chillies and curry leaves - very south indian, isn't it?


Ingredients -

Baby brinjals - 15 nos
Oil - 3 tbsp
Mustard seeds - 1 tsp

For the stuffing:

Coriander seeds/Dhania - 2 tbsp
Channa dal (kadala paruppu) - 2 tbsp
Red chillies dry - 4 nos.
Urad dal (ulundu) - 2 tbsp
Curry leaves - 2 sprigs

Turmeric powder/Haldi - 1/4 tsp
Salt - to taste
Tamarind (as such) - volume of a small ball of diameter 1"


Method:

  1. Prepare the filling by frying all ingredients together without oil, let cool for a while and blend into a sticky powder. We add salt to this itself because we don't have any gravy to add salt to, later.
  2. Wash the baby brinjals clean and dry them with a clean cloth.
  3. Take a brinjal, cut off the stem and carefully make a slit (so as to not cut them into 2 halves!) height-wise.
  4. Fill in the stuffing using a spoon.
  5. Carefully make another slit at 90 degrees. Since you've filled it already, hold the brinjal together and ensure the filling doesn't get wasted.
  6. Fill in again, using a spoon. 
  7. Repeat the same steps 3- 6 for all brinjals.
  8. Now, arrange the stuffed brinjals in a microwave-safe plate. Sprinkle a little oil over them. 
  9. Microwave for 2 minutes. Turn them over, carefully, then microwave for 2 more minutes. This is to marinate the brinjals. 
  10. Take a wide kadai, heat 2-3 tbsp of oil and splutter mustard seeds. Add some fresh curry leaves.
  11. Now is the big step - place the marinated brinjals, one-by-one, in the kadai. Cover for 30 minutes. Turn the heat level to Low.
  12. Always be cautious that the brinjals don't break. We want to see whole brinjals cooked along with the stuffing :) 
  13. After half an hour, turn them one-by-one and cook without the lid or just partly covered. Increase the flame to Medium setting. This might take another 15 minutes.
  14. Use a non-stick kadai, preferably a wide one, for best results.
  15. Turn off when you know they are well done. The brinjals should not be too crisp. Garnish with cilantro/coriander leaves! Serve with hot n spicy rasam, like I did :)


Monday, February 21, 2011

Multi-color Capsicum/Bell pepper Pulao

Pulao or Pilaf or Pilau refers to rice (usually Basmati) cooked with spices and vegetables. You can sure to find varieties of Pulao rice being served in Indian restaurants throughout the world.

The other day, I was so fascinated to see these FRESH and colorful bell peppers at Fairprice (a super market chain at Singapore). They had such blemish-less skin and I was too tempted to take them home. On the way back, it got me thinking as to what am I gonna do with them!

I like to use capsicum in Hakka noodles, and that was one of the handful things that I knew to cook, back then, when I was schooling! After moving to Singapore, we have had a variety of noodles, like Kway teow, Ho fun and I didn't want to make noodles at home as well. Then, I decided to make a colorful pulao with these multi-color capsicums and some green peas. This is pretty quick to prepare, especially, if you've chopped the bell peppers and frozen them, like I did.

So colorful! :)


You Need -

Capsicum/ Bell pepper - 1 each in every color possible
Green peas (frozen is fine too) - 1 cup
Onion (sliced) - 1 (big)
Green chillies - 4
Ginger-Garlic paste - 3/4 tsp
Cumin Seeds (Jeera) - 1 tsp
Fresh coriander leaves/ Cilantro - 1/2 cup
Ghee - 1 tbsp
Cashewnuts - 10 to 12
Salt - to taste
Pepper - 1/2 tsp

Whole Spices or their powder - Bay leaves , cinnamon, cardamom, cloves

And well, Basmati rice, of course!

Green peas , chopped capsicum frozen

 How To -

  • Wash and soak the basmati rice in water, until you get the rest of the stuff ready.
  • In a kadai, heat ghee, allow cumin seeds to splutter and add the spices. I'd remove the bay leaves after a while, as I don't want it to choke my throat when I'm relishing the meal! Powdering all the spices together and adding that is another option.
  • Add slit green chillies followed by sliced onions and fry till onions turn pinkish.
  • Add ginger-garlic paste.
  • Now comes the hero (or heroine) of this recipe - the bell peppers. I like to chop them very finely. You may choose to slice them longer, as we do for noodles.
  • Add the frozen green peas now, then add Salt. Mix them well for about 3-5 minutes.
  • Drain off the water from rice and add the rice to the kadai/pan. This is to ensure the rice gets coated with the flavor of ghee. Mix well for 5 minutes.
  • You can now add water and cook it in the pan itself (closed), or transfer everything to a rice cooker or pressure-cooker or microwave-cooker to cook the rice.  I use one and a half cups of water for every cup of rice. You may reduce the quantity of water if you've soaked the rice too long.
  • After it's done, garnish with ghee-roasted cashews and fresh cilantro! :)


Serve with any raitha (mixture of onions, tomatoes and cucumber (or other stuff) in yoghurt, salted and spiced with hing and chat masala). If you have enough time or have invited some guests over to your place, make paneer-butter masala to go with this. These two would make an amazingly yummy main course!

Sunday, February 20, 2011

Olan (of Kerala)

Olan is a very simple recipe that's spiced with just green chillies and gets its unique flavor from coconut milk and coconut oil. Well, can you expect a Keralite dish without coconut in it? It's the Land of Coconut trees, after all!


This recipe is from my ammamma (mom's mom), passed on to my mom. Though we lived in Madras, my mom makes these typical Kerala vegetarian fare quite periodically since my dad loves them.

Special thanks to Shobana chithi (mom's sister) for proof-reading my recipe and pointing out corrections so that the recipe remains truly traditional.

What She Used -


  • Yellow Pumpkin, Winter melon ( mathan or kumblangai), Zucchini , Old cucumber or any water vegetable - 1 cup or more
  • Red Chori (perumpayar) - 1/2 cup (I did not have this)
  • Black eyed beans or Cow peas (a type of karamani, see picture above) - 1/2 cup
    • Alternatively, use one cup of one variety of the beans, whichever is available.
  • Colocasia (Cheppan kizhangu or Seppan kizhangu ) - 10 to12 pieces, sliced as circles
  • Capsicum - 1/2, sliced
  • Baby Brinjals - 7-8 pieces, sliced into circles (optional, I skipped this)
  • Long beans, cut into 3 cm pieces
  • Coconut/ 3 grades of Coconut milk*  (See Note below)

To Temper -

Coconut Oil- 3 tbsp
Curry leaves - a few (optional)
Green chillies - 4
Salt - 1 tsp


How She Makes It-


  • Pressure-cook the black eyed beans with a little salt. Usually, you may not have to soak them before-hand.
  • Pressure-cook colocasia. Peel off the skin and make sure there is clean from any dirt or mud.

  • Take a kadai, heat 1 tbsp of coconut oil, ear and throw some curry leaves into it. We do not use mustard in this recipe.
  • Slit green chillies along its length and add them.
  • Add the cut ash gourd or any water vegetable and cook them with minimal water.
  • Now, add the cooked beans and colocasia, brinjal, etc.
  • Add required salt.
  • Now is the time to add coconut milk. The 3rd grade milk goes in first. Let boil for 3 minutes, then add 2nd grade milk. Let boil for another 2-3 minutes.
  • Squeeze 2 tbsp of coconut oil and mix well. I always use coconut oil in Kerala dishes to get that authentic taste.
  • Finally, add the 1st grade thick coconut milk and switch off after a minute or less.

We had olan with white rice and upperi (banana chips) for dinner and it tastes just awesome. The best part is that I had to spend less than 30 minutes in the kitchen!


*To get 3 grades of coconut milk - Blend a cup of coconut with some water in a mixie, squeeze off the coconut, filter the liquid, this is thick coconut milk you get. This is called the 1st grade milk. Reuse the coconut, add water again and blend. Repeat the process to get 2nd grade and 3rd grade milk. Obviously, the first milk is the thickest and subsequently the richness reduces and the third milk would be kinda watery with just coconut flavor.

Note: If you're using store-bought coconut milk directly, then you may dilute it to get the equivalents of the 3 grades.


Saturday, February 19, 2011

Baingan Bartha (Mashed/Pureed Eggplant/Brinjal Indian-style)

Baingan, in Hindi means eggplant/brinjal/aubergine. Bartha means a mash-up or a mess, literally. Hence, this dish is a soft mixture of eggplant with tomatoes, onions, garlic, coriander cooked with selected Indian spices. I should mention that this is popular in the Northern India and I, being a South-Indian have tasted it(and loved it) in restaurants serving North-Indian fare. The original recipe I used, is from my chithi, who is well-versed in not just North-Indian and South Indian food but even Mediterranean, Mexican, Thai and Oriental cuisines.

I was not a big fan of brinjals until I was married and was shocked (slightly) when I knew my hubby loves them! Nevertheless, I wanted to cook brinjal for him. So, I started frying them well (for dry brinjal curry), added stuff like onions, roasted peanuts, and gradually, started liking eggplant over time :)

Baingan Bartha is recommended even for eggplant-detesters! Yes, the spongy nature of brinjal and its unique taste can be camouflaged by adding tomato-puree and onions and spicing it up with masala powders!

Choosing good quality eggplants is important and that determines the taste of your final dish as well. I prefer to buy firm ones with bright n shiny skin, not wrinkled and without any brownish spots/patches, and use them within 2-3 days of buying.

Ingredients:

Brinjal/ Eggplant - 2 (if long and slim like the ones I used), or 1 big fat one
Onions (chopped) - 1 cup
Tomatoes - 2
Tomato puree - 4 tbsp
Cilantro (Coriander leaves) - 1/4 of a bunch
Green chillies -3
Garlic - 4 pods
Ginger (shredded) - 1 tsp

Oil - 4 tbsp ( for massaging the skin before burning them + for tempering/tadka )
Cumin seeds (jeera) - 2 tsp
Dhania-jeera powder (coriander+cumin powder) - 1 tsp
Red chilli powder - 1/2 tsp
Turmeric powder - 1/2 tsp
Salt - 1 tsp (adjust to taste)
Garam masala - 1/2 tsp
Pav Bhaji or Chole Masala - 1/2 tsp

Method:

  • Wash and clean brinjals and pat them dry. I didn't hunt for the real fat brinjals, that's supposed to used for the recipe, but these were pretty good too.


  • Apply oil all over the skin of eggplants and microwave for 10-15 minutes.
  • The traditional recipe calls for roasting the eggplant on direct flame to give it a smoky flavor. But I use microwave or oven for speedier cooking! :P
Two of them have their skin on, while the one at the bottom has been peeled off.


  • Allow it to cool and then peel off the skin. When using the flame, the peelability test tells us whether the brinjals are ready or not. Continue to heat more, if the skin does not easily come off. Mash-up the flesh of brinjals. You can also chop some of them, if you like to see whole cubes in your dish.

  • Take a kadai or a pan, heat 2 tsp of oil, splutter cumin/ jeera seeds.
  • After a minute, add the chopped onions and fry for one more minute. Add a little salt(1/4 tsp) for the onions.

  • Now, make a paste of tomatoes, green chillies, garlic and coriander leaves and add to the kadai. Fry till the raw smell vanishes.

  • I like to add tomato puree at this stage. This is optional, of course. I looove the rich tomato taste. The puree (I use Heinz) comes in handy especially when you don't get fresh, ripe and juicy tomatoes. 

  • Mix in shredded ginger and stems of coriander leaves. This gives a nice crunch between the soft mashed-up brinjal.
  • Add a little water and boil the mixture. 

  • When it becomes a little thicker, add the mashed flesh of brinjal. 
  • Add the spices - Red chilli powder, Dhania-jeera powder, Garam masala, Turmeric powder. 
  • Check for salt and add if necessary.

  • Let everything get mixed up together. The final consistency should be thick and pasty and not liquidy. Whirl them all together for a while.
  • Finally sprinkle 1/2 tsp of pav bhaji masala or chole masala and mix. Your baingan ka bartha is ready to go :)

This makes a good combination with chapathis, rotis, phulkas or even plain rice.

Wednesday, February 16, 2011

Masala Dosai

Masala Dosai is a common breakfast/tiffin item in South India and has pervaded to places like Malaysia and Singapore where a lot of South-Indians have migrated decades earlier. It's a nice way to make the simple dosa(or dosai) a sumptuous meal with the addition of potatoes. Even foreigners to Indian cuisine (basically, non-Indians) like dosai so much that they even learn the art of dipping it in a pool of sambar and topping it with chutney and enjoying the delectable dish :) And yes, Indian cuisine is the fifth most preferred in the world by globetrotters according to a recent survey conducted on Hotels.com :) Italian cuisine, known for its pizzas and pastas, came in first, followed by French, Thai and Chinese.

As a child, I always loved paper-crisp dosas and masala dosas and still do. The art of making dosas comes only with practice. That being said, masala dosa is an easy way to spice up a not-so-good dosai :) You can also sneak in other veggies, like shredded carrots, green peas, and many more to the masala and make it healthier!


What I Used-

Potatoes - 4 (boiled)
Carrot - 1 (shredded)
Onions -1 cup (chopped)
Green peas - 1/2 cup
Ginger - 1 tsp (finely chopped)
Green chillies - 4 (cut length-wise)
Besan (kadala maavu) - 2 tsp
Salt - 1 tsp


To temper-

Oil - 1.5 tsp
Mustard - 3/4 tsp
Jeera - 3/4 tsp
Urad dal - 3/4 tsp
Channa Dal - 1 tsp
Curry leaves - a few

How I Made It- 

  • Take a kadai, do the tempering in that order. As always, allow oil to get heated then add mustard, allow it to splutter, then follow through the rest. 
  • Add green chillies and ginger and fry for a minute.
  • Add in the chopped onions and fry till they turn slightly pinkish.
  • Mash 2 potatoes, cube the other 2 and add them. This is to ensure you have some mashed up potatoes to form a base but still can spot some in good shape.
  • Add salt.
  • Now goes the shredded carrots and then the green beans (I just microwave the frozen ones and then add).
  • Mix everything well. When you feel it's going dry, just mix 2 tsp of besan in water (without lumps) and stir that in. This gives a gravyish texture to the masala. There you go! You just need to make the dosas and fill about 3-4 tbsp of masala to each dosa. Enjoy with sambar and/or chutney! :)


To Make Dosa Batter -

  • Soak idly rice and urad dal, for 4 hours (I do it overnight, it's easier), in two separate bowls in the ratio of 3:1 
  • Add 1-2 tsp of methi seeds (vendayam) to urad dal.
  • Blend them to a smooth paste by adding water, little by little, as necessary, and get the required consistency.
  • Add salt and allow it to ferment.
  • Your home-made dosa batter is ready! :)
Do not forget to refrigerate it after 4-5 hours. You may have to add some more water if its gets too thick later.

If there's too much masala left over, get creative and make a quick sandwich for the next morning's breakfast or pack it for your tea-time snack :) I used multi-grain bread and it makes such a wholesome meal :)


Sunday, February 13, 2011

Channa Dal Boli/ Poli (Kadala paruppu Boli)

I can describe boli as a sweet parata with a mixture of coconut, jaggery and boiled channa dal as the filling. Boli can also be made with rawa, milk or maida. It's usually served with kheer/payasam in Iyer weddings in Kerala and Tamilnadu and is quite popular in South India. My mom makes Boli on "Bhogi" day, the day before Pongal/Sankranthi and I tried it this year and was happy that it came out really well in my first attempt.  I packed some for my colleagues the next day and everyone liked it too :)

Dal is the Hindi word for dried lentil and there are different varieties of dals (toor dal, urad dal, moong dal, channa dal, masoor dal, rajma) used in Indian cuisine. Dal is a part of everyday cooking for vegetarian Indians as it is a rich source of protein. Channa Dal is my favorite in any form. I never forget to add it to tadka for dry curries and I loovveee kadala paruppu sundal and chickpea sundal! Oh yeah, channa dal is nothing but split chick pea with its skin removed, isn't it? Well, let me stop singing the fame of channa dal and get back to describe how Boli is made.


What I Used -

Channa dal /Bengal gram dal (kadala paruppu)- 2 cups
Coconut, grated - 1 cup
Jaggery or Sugar - 2.5 cups
Cardamom powder - 1/4 tsp
Maida (All purpose flour) - 3 cups
Turmeric powder /Haldi - 1/4 tsp
Salt - 1/2 tsp
Oil

Channa Dal

How I Made It -


Get the outer dough ready by mixing together maida flour, turmeric and salt with water. Add one-fifth of a cup of oil to the dough and make it elastic. This is important.

Sorry folks, the next time I make bolis, I will definitely add step-by-step photos to show the consistency of the dough and the filling.

For the Filling:

  • Pressure-cook channa dal with some water. 
  • Drain the excess water, mash the cooked dal or just give it a swirl in your electric blender/mixie.
  • Turn on the gas, dissolve jaggery/sugar in a little water(careful, please do not add too much water) and mix grated coconut with it. Jaggery is a healthy alternative to sugar, but sugar makes the procedure easy for you to roll the boli with the filling inside. A specific type of boli made with sugar is very popular in Tirunelveli and is often called 'Tirunelveli Boli'.  But the recipe is different, for instance, no coconut is used. I will post that on another occasion.
  • Add the mashed dal to the jaggery-coconut mixture. 
  • Make small lemon-sized balls of this filling.

Making Bolis:

  • Take bigger sized balls of the outer dough, apply some oil to the palm of your hands and stretch it to a circle.
  • Keep the filling inside, fold the covering from all sides and roll the boli on a greased sheet or on your palms.
  • Take a tawa or dosa kal, spread a little oil over its surface and cook the boli on it. Wait till it turns slightly reddish in color and reverse sides. Be patient and tune the heat setting to Low/Medium. It takes 4-5 minutes for a boli to be ready.
  • Finally, smear ghee (1/4 tsp or lesser) over the boli and relish your bolis :)


Saturday, February 12, 2011

Aviyal (Avial)

Aviyal is a simple recipe that can be made in less than 30 minutes. It's a mixture of vegetables, spiced with coconut, green chillies and jeera (cumin seeds) and seasoned with coconut oil and curry leaves.

This is a classic dish of Kerala and Tamilnadu and is prepared slightly differently in the two states. Since my dad hails from Palakkad/Madras and my mom was brought up in Trivandrum, I'm familiar with the subtle variations too :)


What You Need -

2 cups of Vegetables - Plaintain (raw banana), old cucumber, carrot, beans, potato, peas, yam, drumstick and whatever you like :)
Coconut oil - 4 tbsp
Coconut (grated) - 5 tbsp
Green chillies - 4 nos (adjust according to the spice level you can tolerate)
Cumin seeds/ Jeera - 1tsp
Curd - 3 tbsp
Rice or Rice flour (optional) - 1 tsp
Curry leaves - a few
Salt - to taste
Turmeric powder/Haldi - a pinch (optional)


How To -

  1. Chop the vegetables into 2" long, 1 cm thick slices. 
  2. Cook them with salt and turmeric(optional) till tender. Do not overcook, please. This will take about 10 minutes. Filter off the water.
  3. Blend together coconut, jeera, green chillies and rice /rice flour into a paste. Add a little of the water filtered from the cooked vegetables. 
  4. Take a kadai,  heat 2 tbsp of coconut oil and tear a few curry leaves and add.
  5. After a minute, add the cooked veggies, mix slightly. 
  6. Now, add the mixture from Step 3 and carefully coat the vegetables with the coconut mixture. Add curd now. Ensure that the veggies don't get mashed. Finally, stir in another 2 tbsp of coconut oil.
  7. Switch off the gas after 5 minutes.
Aviyal can be served as a side dish with sambar/rasam , when it is made thick (without curd, Kerala-style). You can make it as a gravy, the Tamil way. I prefer the latter :)

I made a quick weekday-morning aviyal in 30 minutes(including peeling and chopping veggies) with just cucumber, carrots and potato and packed a nice home-made lunch :)

Malabar Velliri or Old Cucumber
 

Wednesday, February 9, 2011

Cauliflower Manchurian (Gobi manchurian)

Manchurian is one of the popular dishes of Indian-Chinese cuisine. India and China, despite being neighboring countries, have varying spices used, distinct flavors in food and different styles of cooking. This is said to have originated with Chinese immigrants to Calcutta and the eastern parts of India.

So, what are the Chinese attributes of Indian-Chinese cuisine? 1. Stir-frying and 2. Soy sauce.  Stir-frying is just a technique of cooking vegetables faster while retaining its flavor. The Chinese traditionally cook in a deep 'wok' on high heat using a little oil/fat.

Soy sauce is made from soy beans and can be found in the Asian/International section of your stores. There are 2 basic types of soy sauce used in Chinese cooking - light and dark soy sauce. For our recipe, it doesn't really matter which variety we use, but, please make sure your soy sauce does not contain MSG.

A friendly warning - Do not mention "Manchurian" to try to flaunt off your knowledge of Chinese food to your friends from South-East Asia!! They wouldn't have heard of it, unless they had tried it at restaurants serving Indian-Chinese food! :D

Without further ado, let's go on to the recipe :)


Difficulty level - Easy 
Time  - 45 minutes


What You Need -

For the Batter:

Cornflour -120 g
Maida (All-purpose flour) - 80 g
Ginger-Garlic-Green-chillies paste - 1.5 tsp
Finely chopped onions - 1 cup
Soy sauce - 2 tbsp
Salt, if needed

For the Gravy:

Capsicum/ Bell pepper - 1 (chopped into 1" squares)
Onion - 1 (finely chopped)
Ginger-Garlic-Green-chillies paste - 1 tsp
Soy Sauce - 3 tbsp
Tomato ketch up - 3 tsp
Sugar - 1 tsp
Cilantro / Coriander leaves - to garnish

How I Made It:

  1. Take a bunch of cauliflower, cut them into florets, cover them with enough water, add 1/2 tsp of turmeric powder, cover & cook for no more than 5 minutes. The turmeric makes the gobi taste great. 
  2. Let them sit for 5 more minutes, then strain the water and keep the florets aside.
  3. Make the batter with the ingredients given above, by adding water little by little, till you get the required consistency. It should neither be too watery nor too thick like a paste.
  4. Dip the florets into the batter and deep fry them in refined oil. Wait to see the golden-yellow color. Drain on kitchen tissues.
Do you think I missed out salt? Nah! Soy sauce generally comes with salt added and that's good enough. Remember we add soy sauce to the batter as well as to the gravy, therefore, check the taste before adding salt.

We're almost there! The rest of the process takes only about 5 minutes. 

  • Take a wok (ok, even an Indian kadai or karahi will do :P). Heat 2 tsp oil, sauté 'Triple G' paste (ginger-garlic-green chillies paste).
  • Stir-fry onions followed by capsicum.
  • Increase the heat to 'High' and add soy sauce. Sprinkle sugar. Add tomato ketch up. Stir well.
  • Add the gobi chunks, mix them together and switch off the flame.
  • This dish should have almost no gravy - just a coating sauce. If it is too dry, add 1/4 cup of water and mix well. 
  • Garnish with cilantro/ coriander leaves.

Gobi manchurian makes a delicious entrée.  It can also be served as a part of the main course with rice or roti.  Enjoy!


Tuesday, February 8, 2011

Tomato and Basil Soup

I didn't know for a long time that Holy basil is our own Thulasi.  Yes! :)  Did you know that? ;)  No wonder it is called the 'king of herbs'. However, there are different varieties of basil and the one used in Italian cuisine is called sweet basil.  Soups are good for health any time of the day and helps to keep your calorie count down.  Let's make it healthier by adding some herbs to it!


Difficulty level - Easy
Time - 10 minutes

Ingredients -

Ripe tomatoes - 4
Red Onion - 1 (or 1/2 if its too big)
Olive Oil - 2 tsp
Basil leaves - 5
Sugar - 1 tsp
Salt
Pepper

3 Easy Steps -

  1. Blend together the tomatoes and onion with 1 tsp of sugar.
  2. Pour the juice into a pot and season with salt and pepper. Add olive oil to it. Bring to a boil.
  3. Sprinkle basil leaves before turning off the fire. 

Note: You may also add a mixture of Italian herbs in lieu of just basil.


Sunday, February 6, 2011

Beetroot kurma (Beetroot masala)

The goodness of beetroot is that it contains no fat, very few calories and is a great source of fiber. Beetroots are a rich source of magnesium, sodium, potassium and some Vitamin C and its juice is said to lower blood pressure and therefore can prevent cardio-vascular problems.

We all know that beetroots taste sweeter and there is a particular variety called sugar beet which has a high concentration of sucrose.

My mum-in-law leveraged on the attribute of beetroots to taste sweet and combined it with traditional Indian spices and concocted a recipe that's also quite rich because of the addition of coconut and cashewnuts.


This is the first recipe I learnt from her and I've made it numerous times, given that my hubby loves it and doesn't take beetroot in any other form! It goes well with both rice and roti.

This is How She Makes It :-

Wash and clean 2 beetroots and 1 potato. Cut off the stalks from beetroots and scrap off the skin from the vegetables.


Make small cubes and add a tsp of finely chopped ginger. Now, pressure cook the chopped vegetables with some salt.
Don't worry if the potatoes take on the color of beets and turn pink too. When you drain the excess water, save some stock to add to our gravy later.

Heat 1 tsp ghee in a deep pan. Allow mustard seeds to splutter and then add a few cloves(grambu) and fennel seeds (sombu).  Meanwhile, make a paste out of onions, bayleaves, cinnamon, cardamom, cloves, poppy seeds(khus-khus).


Add this onion + spices paste to the pan. This should get cooked well. We do not want the raw smell of onions in our dish.
Add ginger-garlic paste to this and pour the juice of 2 tomatoes.


Mix well and let it cook for a couple of minutes. Now is the time to add the boiled vegetables. Sprinkle salt, red chilli powder, garam masala, turmeric powder, as necessary. You can add the stock now if the mixture looks too dry. Mix well and keep the pan covered for 10-12 minutes. 


Now, grind together 3 tbsp of grated coconut along with 10-12 cashewnuts and be ready.


Open the pan and check for salt and spice level. Finally, add the cashew + coconut paste and stir for 3-5 minutes. Your beetroot kurma is ready to eat :)


This is a good way to make kids eat beetroots. Optionally, you can increase the quantity of potatoes.

Hope you try this and your family likes it too :)


LinkWithin

Related Posts Plugin for WordPress, Blogger...