Showing posts with label dessert. Show all posts

Tuesday, May 26, 2015

Low fat Fruit and Nut Cake ~ Christmas Cake - Butter-free, Eggless cake :-)

Nowadays, I am inclined towards fat-free baking. True, we cannot avoid sugar in cakes, but we can minimize them by adding natural sources of sweetness. What do we do for butter? Substitute with natural sources of fat, that are good for your heart.


Guilt-free Fruit & Nut Cake 


Here's my Low fat Fruit & Nut cake that absolutely delicious and nobody can tell its butter -free or has no plain flour.


I've adapted the recipe from maria's menu but made it healthier by using Avocados and 100% whole wheat flour in place of Maida / All purpose flour/Plain flour. Read on ...

Ingredients:


2 Avocados - ripe (dark green in color)
Whole wheat flour - 1.5 cups
Brown sugar - 1 cup
Dry fruits (like raisins, tutty fruity, apricots, figs, ) +
Nuts (I used chopped almonds and cashews) = totally 1 and 1/2 to 1 and 3/4 cups roughly
Fruit juice (I have tried both Apple juice and Cranberry juice with good success)
Hot milk - 1/4 cup
Yogurt - 1/2 cup
Vanilla essence - 1 tsp

Baking powder - 0.5 tsp
Baking soda- 0.5 tsp
Cardamom powder - 1 tsp
Cinnamon powder - 0.5 tsp
A pinch of salt


Preparation -


  • Soak the dry fruits in the fruit juice overnight.
  • Drain the juice( save it so you can drink later!) and take  the soaked fruits and nuts in a bowl.
  • Coat it with 2 tbsp of flour roughly.


  • Start by pre-heating your oven to 180 degrees.
  • Sieve the flour along with a pinch of salt and baking soda, baking powder --> all dry ingredients. Add cardamom and cinnamon powder.
  • Beat the avocados (pitted) with sugar in a mixie.


  • Add hot milk to yogurt and mix this to the avocado-sugar mixture. Sure, the batter appears curdled at this stage but fret not!
  • Add vanilla essence as well.
  • Slowly mix the sieved flour mixture into the wet batter mixture until well-incorporated. You can add more chopped nuts at the stage. I like to add some walnuts :-)


Batter ready to go into the oven! 

  • Prepare a pan by lining with baking paper. Pour the batter and let the oven do the magic :-)

  • Do check after 20 minutes using a toothpick to see if the cake is done/ nearing doneness. If its too wet, let bake for another 5 to 10 minutes. Adjust timing by checking every 5 to 7 minutes. If the top is brown but the insides are uncooked/wet, then cover with an aluminum foil so that the top doesn't get burnt.


Just out of the oven! Heavenly goodness!

Enjoy your cake guilt-free :-)

This is suitable even for heart patients as there is no butter or oil added.

This year (26th Dec 2015), I made this lovely cake again for a potluck party and it was a big hit!!
Some photos -
Christmas Cake

Shopped for dry fruits and nuts and candied fruits :-)


Saturday, July 6, 2013

Mango Shrikhand - Creamy Sweet Mango Yogurt with crunchy nuts :-)

The Mango season is about to be over and now I rush to the Indian store to grab a few and make some Mango specialties :-)  I have been thinking of making Shrikhand at home ever since I shortlisted it as a fat-free recipe (basically if u make yogurt with fat-free milk, that is :P)  Finally, got around to make this delicacy for my hubby who said it's equivalent to Meiji/Marigold Mango yogurt :-) That's a compliment, I suppose! :-)

Mango Shrikhand

Yield - 4 ramekins (as in the picture)

What You Need-


Ripe Mango - 1 (medium size)
Fresh Yogurt/ Curd - 1 litre
Sugar - 3 to 4 tbsp (adjust according to the sweetness you prefer)
Cardamom powder - 1/4 tsp
Nuts of your choice - I used Almonds and Cashews

Mango Shrikhand

Procedure -


1. Make Greek Yogurt following the procedure here. This takes 6-8 hours in the fridge. But you don't have to do much actively!
2. Blend mango in a mixer and get the puree.
3. Powder sugar.
4. Mix in powdered sugar, cardamom powder and the mango puree into Greek Yogurt and whisk them all together until you get a smooth texture. This is reallly important.
5. Chop some nuts and mix them too. Almonds would need to be blanched. Pistachios would be awesome, but I didn't have any yesterday. Reserve some nuts to garnish on top later.
6. Pour into ramekins or ice-cream cups and decorate with nuts. Refrigerate for another 3 hours to let it set well.
7. Serve chilled.

Simply awesome! Don't go by my words, try for yourself :-)

Umm...Slurp!


Monday, July 1, 2013

Aval Kesari / Poha Halwa

Hello friends! I've been away from blogging after little K arrived and life has been really busy yet sweet :-) Nevertheless, with a little help around, I hope I can manage to keep my passion for cooking alive and continue to dish out new stuff that everyone enjoys!

Yesterday, I made a really quick Kesari with Aval (Rice flakes) and it turned out awesome!! Rawa Kesari aka Sooji Halwa is quite a popular sweet and this variation uses Aval in place of Rawa/ Sooji and reduces the cooking time drastically as well as makes the sweet practically foolproof. With the traditional Kesari, one has to take care to ensure there are no lumps while the rawa gets cooked and once there ARE lumps(which is usually the case), it's a tiring job to mash them and create a uniform texture.


Aval Kesari / Poha Halwa

Yield - 2 to 3 persons

Time - 15 minutes end-to-end


Ingredient List -


Aval / Poha/ Rice flakes- 1 and 1/4 cups
Sugar - 3/4 cup
Boiling Water - Start with 1/2 cup and add as you go
Ghee - 3 to 4 tbsp
Cashewnuts - 10 nos.
Food color (orange) - a pinch or two
Cardamom powder - 1/4 tsp

Recipe -


  • Roast the cashewnuts with a tbsp of hot ghee on a pan. Set the roasted nuts aside but let the remaining ghee stay on the pan.
  • Transfer the measured Aval into the pan with ghee (add some ghee if there's nil left after roasting cashews) and fry them for a short while.
  • When all the aval flakes are covered with ghee (and not dry), pour boiling water (just microwave water for a minute) into the pan.
  • The Rice flakes/ Aval starts cooking. When all the water is absorbed and the aval doesn't seem fully cooked yet, add some more water (boiling). Reduce flame to low.
  • When its 3/4th done, add the measured sugar. As the sugar melts, there is more liquid in the pan. Add a pinch of food color and cardamom powder. 
  • Let the Kesari get cooked well and come together. You may add the remaining ghee at this stage if the sweet starts sticking to the bottom of the pan. I used a non-stick pan and I didn't have to add anymore ghee.
  • Finally, mix in the ghee-roasted cashewnuts! 

Enjoy :-) If you're a fan of Aval, do check out Aval Payasam / Kheer made with Poha(Rice flakes).


Tuesday, October 16, 2012

(Red) Banana Halwa - Chev vazhai pazha Halwa

Step out of Palakkad (Palghat) station and all you can see is shop after shop, tempting you with different varieties of Halwas (or Haluwa! as they call it) and Chips. Vibrant colors and the rich aroma of ghee - ummm :-)  They make a good combination too - halwa for sweet and chips for something savory.  We always bring back freshly-made Halwa and Chips (especially love the sweet banana chips ;-)) whenever we visit Palakkad.

Bananas and Halwa go hand-in-hand  - both are gooey substances and since bananas are so sweet themselves, we can cut down on the added sugar and still have a great-tasting sweet! In addition, this doesn't take more than 25 minutes (end-to-end) on stove-top and it just tasted awesome even with the minimum amount of ghee I used :-)  I'm very happy with the results and so were my guests!


I didn't plan to use Chev vazhais (Chivappu means Red in Tamil, Chev is derived from it) specifically but I was ecstatic when I spotted them in Bukit Gombak market one day! You can use any bananas to make this Halwa!


Ingredients -


Ripe bananas - 5
Sugar - 80 ml
Ghee - 3 tsp
Cardamom powder - 1 tsp
Cashews - about 12


Method -


  • Peel and mash bananas with a potato masher.

  • In a kadai, heat 1 tsp of ghee and roast cashewnuts. Keep aside. 

  • Add another tsp of ghee and add the banana puree.

  • Stir well for about 12-15 minutes. Take care to ensure that it doesn't stick to the bottom of your kadai/pan.
  • Add 1 tsp of ghee and add all the sugar and mix well with the banana mixture in the kadai.
  • Wait until the banana puree changes to a brown color (பழுப்பு நிறம்). By this time, the whole mixture comes together so well into a mass (see pic below). The glossy effect is due to the caramelization of sugar (we haven't added much ghee, remember?)

  • Reduce the flame and sprinkle cardamom powder.
  • Add ghee-roasted cashewnuts and mix for a minute.
  • Spread on a greased plate and make squares on cooling. 

Yield - I got about six, rather big 2 inch-by-2 inch halwa pieces.


Sunday, October 14, 2012

Badam Ladoo/ Laddu - No sugar or ghee added! - 5 Minute Recipe!

You can make Badam Laddu without sugar (in fact no extra sweetener added) or ghee! Did you know that? Well, I didn't know it too, until a good friend of mine, Karpagam aunty told me the secret! She let me taste the laddu first and then told me that it's a single ingredient sweet!!! I couldn't believe it! Absolutely yummy and so easy to make!

So full of nutrition (good cholesterol), it is great for both kids and adults alike to eat a laddu a day! :-) This is an easy, healthy and a really quick recipe :-) What are you waiting for!!


What You Need -


A cup of badam or raw almonds

That's it!!! :-) No, I'm not joking :-)


How To -


  • Spread the raw almonds on a microwaveable plate and microwave for 2-3 minutes. The heat helps to release the natural oils in them. Alternatively you can toast them on a tawa too, but be careful not to burn them.
  • Let cool.
  • Take your mixer (the one in which you powder dry ingredients) or coffee grinder and powder the almonds. don't bother if it's a bit coarse! That will add some crunch too!
  • Transfer to a wide plate and make them into small round balls (typical size of laddu you would make). You don't need to add ghee for binding, they come together easily with the inherent oil in them. Be patient, you have to hold each laddu tightly for a good 30 seconds to 1 minute to help them keep the shape.

Enjoy!!!


Notes -


  • You may add a teaspoon of warm milk to bind, but that would lessen the shelf life a lot - you can't keep for more than 2 days! 
  •  With 150 to 180 grams of almonds, I got about 10 laddus.  I had opened the pack earlier and used for making something else (or just gobbled up a few plain!) so I had less than 200 grams for preparing these laddus.
  • If you still don't trust my words, make just 1 laddu and taste it and check for yourself if the sweetness level is sufficient. If really required, powder 2 tbsp of sugar and heat & add 2 tsp of ghee to suit your tastebuds.

What healthy recipe did you recently experiment on and were satisfied with? Please share with me! :-)


Thursday, October 11, 2012

Peda using Gulab Jamun Mix - Super Quick Sweet in 3 minutes!

So, I had a packet of MTR Gulab Jamun Mix sitting in my pantry and about to expire in a month's time. I definitely did not want to make them into jamuns...deep frying plus lots of sugar in the syrup...strictly prohibited, given the rate at which I am gaining weight nowadays. I looked at what went into the Jamun Mix and had to think hard looking at the ingredients' list. Obviously, sugar was out of the equation, so I thought of jaggery spontaneously.  I decided to make jaggery syrup and mix in this powder but that turned out to be not-so-good. Figured out it needed some diary products (too much of wheat cream doesn't taste good), so I made jaggery syrup with milk (and not water) and also added some milk powder along with the Gulab Jamun mix. Parfait!


What I Used -


100 g of MTR Gulab Jamun Mix
50 g of Nestle Instant Milk powder
3 tbsp of jaggery
2 tbsp of milk
2 pinches of cardamom powder
2-3 pistachios - to garnish
a few drops of oil - to bring everything together and make into pedas.

How I Made These Cute Pedas -

  1. Added jaggery and milk to a microwave-safe bowl and microwaved for 2 minutes.
  2. Once syrupy, added the Gulab Jamun mix powder and the Milk powder, along with cardamom powder.
  3. Used my hand (clean!) to bring everything together. Had to sprinkle a teaspoon or two of milk powder additionally since it was a bit too sticky.
  4. Finally, brought the whole mass into a rather tough dough after greasing my palms with oil.
  5. Divided the dough into 6, shaped them into balls first and then flattened into pedas.
  6. Decorated by pressing the center a bit and filling with crushed pistachios!
  7. Keep them refrigerated and Microwave each peda for 30-40 seconds just before serving.
Voila!


When I showed this to my dad, he asked me if I bought them from Sri Krishna Sweets! Isn't that enough? :-)

Make these pedas and show off to your friends and family and let them marvel at your culinary skills and creativity! Enjoy :-)


Notes:


  • Shred and Use Paneer in place of milk powder for enhanced taste
  • Replace jaggery with sugar (brown or white) for a different flavor.
  • Since we add fresh milk to this, finish consuming the pedas within a day or two! (As if this has been a problem anytime! :D)
  • Microwave times vary with the power of your microwave, so adjust accordingly. Mine is a 1000 W oven. 
  • I got 6 pedas (as in the picture) with the above quantities. 


Thursday, March 15, 2012

Beetroot Halwa Using Microwave - Only 15 minutes!

Beetroot Halwa is the tastier cousin of Carrot Halwa /Gajar ka halwa. It is obvious because beets are sweeter than carrots and that means, you add less sugar! Isn't that healthier?

I made a quick dessert in about 15 minutes and the best part is that I didn't really have to sit (or stand) and keep stirring it. That's the microwave magic! Most part of it gets done when you're busy doing something else!

Beetroot Halwa!

Take the following -

  • Beetroot - 1 (medium size)
  • Milk - 180 ml
  • Condensed milk - a little more than 1/3 can (A regular can is about 400 ml, so use 150 ml) => Low-fat is good too!
  • Ghee - 2 tsp
  • Cashews - 8 nos.
  • Sugar - 6 tsp (Reduce 1 or 2 tsp if you desire lesser sweetness)

 5 Quick steps -


1.  Peel and grate the beetroot into a big microwaveble bowl.
2.  Add milk and MW on High for 5 minutes. Let sit for a minute.

3.  Stir, then add sugar and microwave for 3 minutes. Let sit for a minute.

4.  Stir,  add condensed milk and MW on High again for 4 minutes.
     The mixture should now be cooked very well yet it will be a little runny. 

5. Take a kadai, heat ghee and roast cashews. Then add the cooked beet mixture and stir for 3-4 minutes on medium heat. Switch off heat and let sit for 2 minutes.  It's thickened and pasty now, just like halwa should be!

C'mon lick it off, straight away! :-) This pic explains how good the halwa tasted!

Beetroot Halwa - Quick n Easy!

These quantities serve 2 to 3 people. Store in the fridge for a day or two (if there is any!).


Saturday, March 3, 2012

Low-fat, No-bake Chocolate Mousse! Within 10 minutes!

Wondering how chocolate mousse can be low in fat and yet delicious? Yes, there's no cream nor egg yolks but there's tofu....Silken Tofu...Extra smooth... :-) It's unbelievably quick to make for that lingering taste it leaves behind! And....there's no baking involved at all!

Creamy Chocolate Mousse - without any cream! ;)


Do not deprive yourself of this opportunity that could turn even tofu-detesters to fall in love with this Tofu-Chocolate marriage! Yes, Tofu is so bland that makes it so versatile, it absorbs whatever you add/ blend with it. I learnt about Tofu after coming to Singapore as it's widely used in Asian cuisine.  Tofu is made from soybeans/ soy milk just like how Paneer is made from Milk. Isn't it nice to get some extra protein even as we consume desserts? :-)

Chocolate Mousse - Low-fat!


Yield - 4 medium-sized ramekins

What I Used -

Simple Ingredients, right in your pantry!

  • Extra smooth Silken Tofu - 300 g
  • Pure Cocoa Powder (don't use drinking chocolate) - 3 tbsp
  • Chocolate Chips (Semi-sweet works best) or Dark chocolate (I used 53%) bars* ~ 100 g
  • Milk - 1/4 cup
  • Vanilla extract - 1 tsp

* There's no need to add extra sugar as the sugar present in Chocolate bars/chips was found to be sufficient. However, if you think your family doesn't like Dark chocolate as such (if they call it bitter!) , then, may be you should try using Milk chocolate instead. Best to start with a combination of milk and dark - 50% each!


How To -


1. Drain the water from tofu and blend into a really smooooth paste in an electric mixer/blender.
Siken Tofu, blended smooth


2. Microwave milk for a minute and add cocoa powder to hot milk. Whisk them well together without lumps.

3. Microwave chocolate chips or chocolate bars until it's all melted.

4. Add 2 + 3 + vanilla to the smoothly blended tofu and run the electric mixer again.

5. Pour into serving cups (I used colorful ramekins!) and refrigerate (do NOT freeze)  for about 2 hours. The more time you let it sit in the fridge, the better it gets!


6. Optionally, grate some dark chocolate onto each cup and serve chilled.

Let me tell you that it may not taste good if you lick off a spoon BEFORE refrigerating it. But AFTER 90 minutes (yes, I secretly tasted a spoonful after 1 and half hours!), you're transported to heaven! Absolutely like the Before-After pictures that Slimming companies, Hairloss treatments and the like advertise with! :D

Nobody can tell there's tofu in the mousse! That's the beauty! :-)

Rich n decadent choc mousse
C'mon, make it NOW and surprise your family!!!

Smoooth...


Saturday, January 7, 2012

Easy-peasy Chocolate Cake - Happy Birthday Sis!!! :-)

Today is my sister's birthday and I baked this chocolate cake to celebrate it :-)  How I wish I could walk across the street (and not having to fly for 4 hours + spend 3 hours at the airport), feed her and see her relish the cake!

Happy Birthday!

The specialty of this recipe is that it is absolutely eggless (Yes, no need to think of substitutions for egg! Isn't that wonderful?) and free from butter! Plus, there are no fancy ingredients and I am quite sure you'll have all the stuff stocked in your kitchen at most times. Although there is oil being used, I would soon be trying it out with half prune extract and half oil and I believe (from my prior experiments) that wouldn't significantly affect the quality of the end-product. Will update y'all with the results.

Update:

I replaced 3 tbsp oil with prune essence and used just 1 tbsp oil and there was absolutely no difference to the taste or texture! Yum-yum-yummy!!!

Take a bite, please!

Things You Need -


Dry Ingredients -


Flour (I used Whole wheat) - 1 and 1/2 cups
Baking soda - 1 tbsp
Salt - 1/4 tsp
Cocoa powder - 3 tbsp

Wet Ingredients -


Water - 1 cup
Sugar - 1 cup ( (I used 1 and 1/4 cups brown sugar as I didn't have enough white sugar!)
Vinegar (White or Apple-cider vinegar or simply concentrated lemon juice) - 1 tbsp
Vanilla essence - 1/2 tbsp
Oil - 4 tbsp
Chocolate chips - 2 handfuls ( I like mine to be really chocolatey...Ummm :-)

Birthday Cake for Dear Sis!

Procedure -


The recipe is so simple! Sift and combine the dry ingredients in a big bowl. Whisk together the wet ingredients in another bowl. Add the dry to the wet. Whisk well. Add in some (a handful) chocolate chips finally and mix once slightly.

Line a baking dish and pour the mixture (it's kinda watery and not thick unlike usual cake batter, but don't panic, all is well!). Sprinkle some more (another handful) chocolate chips.

Bake in a pre-heated oven at 180 deg Celsius for about 35-40 minutes. When tested with a toothpick, it might be a bit moist. Decorate with Icing of your choice!

So soft and delicious!


Sunday, January 1, 2012

Blueberry Streusel Cake - Happy New Year!!!

I'm really fond of fruits in my cake and the berries, full of anti-oxidants, are definitely special! As a child, I haven't seen Blueberries or Blackberries and was fascinated to see some fresh produce here in Singapore! We do get Strawberries in India from places like Reliance Fresh or Nilgiris Supermarket and whenever appa brings home these cute fruits, amma makes fresh smoothies that taste so heavenly!

I am immensely delighted that this is my 100th post (Yeh!!!) and today is the 1st day of 2012 :) This is Celebration time! I decided to splurge a bit today and baked this one, without substituting butter with anything else! I did feel a bit guilty on creating some exceptions, but I guess we really enjoyed every piece of the cake :)

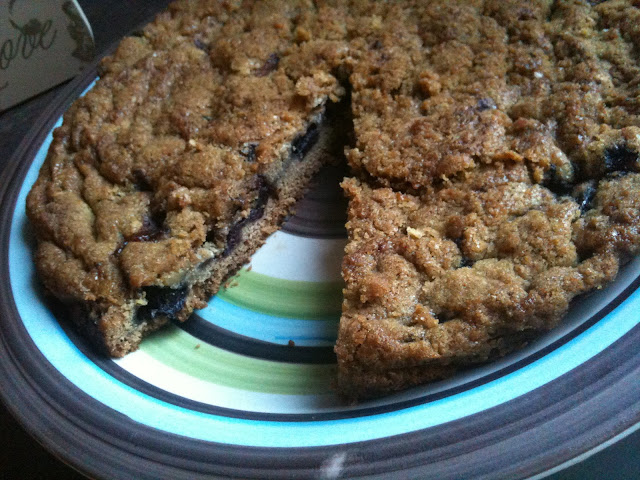
Blueberry Cake with Streusel Crumb Topping

The basic cake recipe is adapted from Joy of Baking, but the streusel topping is my own combination, with some oats and walnuts added for the crunch!

Blueberry Streusel Cake

What I Used for the Cake Batter -


Dry Ingredients -


All purpose flour - 1/2 cup
Whole wheat flour - 1/2 cup
Salt - 1/8th of a teaspoon
Baking powder - 1 tsp

Wet Ingredients -


Butter (unsalted) - 1/4 cup 
White Sugar - 1/2 cup
Flaxmeal - 1 tbsp soaked  3 tbsp of warm water for 5 minutes (or 1 egg)
Milk - 1/3 cup
Vanilla essence - 1/2 tsp
Blueberries - 350 grams

Blueberries - out of the freezer!

For the Streusel Topping -


All-purpose flour - 1/2 cup
Brown sugar - 1/2 cup
Cinnamon powder - 1 tsp
Walnuts (coarsely chopped) - about 10
Oats (Quick Cooking) - 1/4 cup
Butter - 3 tbsp


Steps -


To Make Streusel Topping -


Mix the flour, oats, cinnamon and sugar together. Cut in the butter with a fork and blend well until it forms coarse crumbs. Add chopped walnuts. This is the streusel topping. Keep it aside.

To Prepare the Cake Batter -


  • Sift the dry ingredients and mix them together.
  • Beat the butter until smooth and cream sugar along with it.
  • Whisk flaxmeal with warm water until it becomes sticky. Then, add it to the creamed butter-sugar mixture. Please look up this recipe for pictures of freshly ground flaxseeds and how it looks when whisked with warm water.
  • Add vanilla and beat until well-incorporated.

  • Now, add the flour mixture (dry) to the wet and add milk gradually and mix until just combined.
  • Take out your cake pan, grease with butter (or use a baking sheet as a liner) and pour this prepared batter on top of it.
  • Arrange blueberries on top of this batter.


  • Sprinkle the prepared streusel topping on top. Press slightly with a spatula.


Bake for 40 to 50 minutes until a toothpick inserted into the center of the cake, comes out clean, without anything sticking to it. Remove from the oven and let cool on the wire rack.


Blueberry Cake with Streusel Crumb Topping


The streusel crumb topping is the BEST part of this cake! It is ABSOLUTELY RICH with butter and sugar and the addition of oats and walnuts give it the much needed crunch :) I say, its so much better than cakes loaded with cream on top! Do try this and your taste buds will be soo pleased that you'll want to make it over and over again! :-)

Serve fresh out of the oven when it's still warm. Refrigerate the cake (if anything remains!) and it will stay good for a week.


Wishing everyone a fantastic new year filled with good health, joy and prosperity!!! :) 


LinkWithin

Related Posts Plugin for WordPress, Blogger...