Showing posts with label north-indian. Show all posts

Saturday, July 6, 2013

Mango Shrikhand - Creamy Sweet Mango Yogurt with crunchy nuts :-)

The Mango season is about to be over and now I rush to the Indian store to grab a few and make some Mango specialties :-)  I have been thinking of making Shrikhand at home ever since I shortlisted it as a fat-free recipe (basically if u make yogurt with fat-free milk, that is :P)  Finally, got around to make this delicacy for my hubby who said it's equivalent to Meiji/Marigold Mango yogurt :-) That's a compliment, I suppose! :-)

Mango Shrikhand

Yield - 4 ramekins (as in the picture)

What You Need-


Ripe Mango - 1 (medium size)
Fresh Yogurt/ Curd - 1 litre
Sugar - 3 to 4 tbsp (adjust according to the sweetness you prefer)
Cardamom powder - 1/4 tsp
Nuts of your choice - I used Almonds and Cashews

Mango Shrikhand

Procedure -


1. Make Greek Yogurt following the procedure here. This takes 6-8 hours in the fridge. But you don't have to do much actively!
2. Blend mango in a mixer and get the puree.
3. Powder sugar.
4. Mix in powdered sugar, cardamom powder and the mango puree into Greek Yogurt and whisk them all together until you get a smooth texture. This is reallly important.
5. Chop some nuts and mix them too. Almonds would need to be blanched. Pistachios would be awesome, but I didn't have any yesterday. Reserve some nuts to garnish on top later.
6. Pour into ramekins or ice-cream cups and decorate with nuts. Refrigerate for another 3 hours to let it set well.
7. Serve chilled.

Simply awesome! Don't go by my words, try for yourself :-)

Umm...Slurp!


Thursday, October 18, 2012

Dal Makhani aka Maa ki Dal - Punjabi Cuisine


After a hat-trick of sweet recipes, I thought I should post something spicy for a change. I am at my mom's place right now and she won't let me cook anything elaborate, so I browsed through my Drafts and found this one waiting to be beautified and posted :-)

I had made this months ago when I had invited some friends home for lunch on a Sunday.  Dal Makhani is a sumptuous dish full of nutrition from dals/lentils and the cream on top to finish just makes this a super-hit with everyone! :-)  It goes very well with both rice and roti varieties alike. I generally make a simple Garlic Rice or Jeera Rice and they make a good pair.

Dal Makhani

Let me take you through a pictorial first :-)

Rajma and Black whole Urad dal soaked in water overnight

Tadka with butter, zeera and red chillies

Onions fried

Tomatoes mushed up

Add spices, cooked dal and finish with cream :-)

What I Used -


Rajma / Red Bean- 1/2 cup
Whole Black Urad Dal - 3/4 cup
Onions - 1 medium
Tomatoes - 2 medium (Using additional Tomato puree greatly enhances the taste)
Fresh Cream - 4 tbsp + 1 tbsp


Spices To Temper - Tadka - Thalikka -


Butter - 1 tbsp
Jeera - 1 tsp
Red chillies - 4
Ginger-Garlic paste - 1 tsp
Turmeric / Haldi - 1/4 tsp
Red chilli powder - 1 1/2 tsp (I used Kashmiri variety for a rich color)  
Dhania powder / coriander powder - 3/4 tsp
Cinnamon, cloves, cardamom spice mix - 3/4 tsp (you can get them pre-made from your Indian store or powder them yourself using your dry spice grinder)
Kitchen King Masala - 3/4 tsp
Salt - taste


How To -


  • Soak the lentils overnight with enough water. Drain the water and pressure-cook the dals with sufficient (fresh) water for 4-5 whistles (It's okay to over-cook than to under-cook the lentils) .You could add salt as well. Wait for the pressure to get released naturally.
  • Take a kadai, melt butter and add jeera. When they crackle, add red chillies and then add ginger-garlic paste.
  • Add finely sliced/chopped onions and let them turn brown.
  • Add chopped tomatoes and let them turn mushy.
  • Add the spice powders - turmeric, red chilli powder, coriander powder, kitchne king and the cardamom-cinnamom-cloves spice mix.
  • Add the water/ stock from the cooked dal and then slowly add the lentils and lower the flame. Let the dals absorb the flavors form the masalas. Close with a lid for about 5-7 minutes.
    • Tip : I like to mash up about 4 tbsp of cooked dal and then add to the gravy. This gives thickness to the gravy and also a good flavor to Dal Makhani as such :-)
  • Check for salt.
  • Add cream and mix well and you can see the gravy coming together as a thick, creamy mixture :-)
  • Serve hot. You could add another tablespoon of cream just before serving! :-)

Isn't it inviting ??


Sunday, December 18, 2011

Aloo(+Methi) Paratha - Easy method for Beginners

Hello friends! Today's post is gonna be about a recipe which really boosted up my confidence that I can cook well too, back in the days I began experimenting in the kitchen.  I thought it's definitely a nice idea to share it with everybody and I hope this will motivate novice cooks to succeed. 

A picture speaks a thousand words! This is going to be a pictorial with lesser noise from me! :)

Potato-stuffed Parathas

Yield - 8 Stuffed Parathas


What I Used -


For the filling -


Oil/ Ghee/ Butter (or a combination)- 1 and 1/2 tsp
Omam / Ajwain/ Carom seeds - 1/2 tsp
Onion - 1  (chopped)
Ginger+Garlic paste - 1 tsp
Green chillies - 4
Potatoes - 2
Coriander-cumin powder (Dhania-Jeera) - 1 and 1/2 tsp
Turmeric - 1/2 tsp (or slightly less)
Kitchen king masala - 3/4 tsp (optional)
Salt - to taste
Fresh Fenugreek leaves (Methi) -  1 cup (loosely packed)

For the paratha dough -


Wheat flour - 4 cups
Warm water - 1/2 cup
Yogurt /Curd - 4 tbsp
Salt - to taste
Oil - 1 tsp

How To-


Paratha Dough - soft and pliable

  • I start with the dough so that it rests for a while and the filling gets made in the mean time.
    • Take a big mixing bowl, measure and add wheat flour (actually one gets a sense of the quantity by practice and if it happens to be in excess, you can always wrap the remaining dough in cling film and refrigerate to be used the next day).
    • Add salt and slowly pour warm water and start mixing the dough. When they have slightly come together, add yogurt and knead well. Yogurt helps to give softness to the parata. Knead well for about 3-5 minutes  and finally add oil and get a smooth dough. 
    • Cover the bowl with a lid and let rest for about 30 minutes. 

Let's make the filling now.  As usual, I have listed the ingredients in the order they go into the recipe.


Heat oil in a pan/kadai, add carom seeds then fry onions

Add ginger-garlic paste, fry for 2 mins, then green chillies (Oops! I used Red Chilli Padi that I had on hand)

Cook 2 potatoes in a pan with sufficient water and salt

Peel cooked potatoes and mash them

Add mashed potatoes to the pan, add the spice powders + salt

Mix well till everything comes together...

Stuffing for Alu Parathas

Finally, I added Fenugreek / Methi leaves because I had them in the fridge and wanted to use them while they were still fresh. For traditional Aloo Parathas, it's really nice to add some fresh coriander leaves/ cilantro.

Now to the most important part of stuffing the parathas and rolling them beautifully ...


The secret to getting stuffed parathas right, is now out!

  1. Take a small lemon-sized dough, roll it into a rather thin paratha (using a rolling pin).
  2. Take some filling and spread it evenly (without bumps) on the rolled out paratha with a spoon. 
  3. Roll out another plain paratha and place it on top of the first one that already has the filling spread on its surface.
  4. Once the two are super-imposed almost perfectly, seal the edges by tucking them and pressing them with your fingers. The dough being soft with stick to each other, just like that (Attraction of like molecules)!

Notes:


1. The two parathas that make up a stuffed paratha should be ~ of the same shape. It is likely that you'll get (more or less) the same shape if you start with the same quantity of dough for both.

2. This method applies for any stuffing - Paneer parathas, Cabbage parathas, Broccoli parathas and virtually anything you can imagine.

3. You need to let the prepared stuffing to cool sufficiently, before rolling parathas. When hot, they stick too much and could get messy! 

Secret #2

Any Stuffed paratha remains softer longer (and tastes a lottt better) than a plain paratha, even when prepared by someone inexperienced with the tricks of kneading a soft dough!

Although this method yields delicious parathas, some folks like their Alu Parathas better if they get to see some stuffing visible on the paratha itself. Now, this is a challenge (atleast to begin with) as you should show some filling but still cover it all up with a thin layer of dough. Here comes the

Traditional method -


This pic / step is the key. You can see that the filling is placed right at the beginning of the rolling process, when the paratha is still relatively thicker. Also, you make folds on the dough while trying to cover up the filling. This ensures there is sufficient dough to sorta protect the filling from spilling out of the covering when you roll it out.


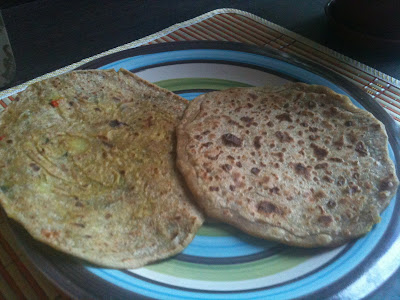
Cook the parathas on a hot tawa, as we do with any other paratha (please refer to Sweet potato paratha, Methi paratha for the detailed procedure and some tips).  Finish off with a drop of ghee!


When you compare the 2 methods(see pictures of both above), the first one (beginners' method) allows you to insert more filling per paratha. This is useful if you have a fussy child (or spouse;) who promises to go by the numbers and eat exactly 1 or 2 parathas only ! You can be assured they had a filling meal as you have stuffed a 'generous' portion of potatoes, which is full of carbs! You can also roll out a bigger circle to increase the quantity of intake but that's a very obvious change :)

Super-imposed parathas (Beginner method) - torn to reveal the filling inside!

Since the filling has all the required spice and salt content, this can be had as such and is ideal to be taken to your workplace (like a wrap) too. I try to buy a single-serve pack of flavored yogurt (preferably mixed berries) and give a finishing touch to my meal. When at home, I eat with raita (beaten yogurt with chopped onions and tomatoes spiced with salt and asafoetida)!


Wednesday, December 14, 2011

Methi and Spring Onion Paratha / Thepla - Indian Flat bread with fenugreek leaves and Spring onions

Fenugreek brings remarkable health benefits! Its seeds, leaves(both fresh and dried) is extensively used in Indian cuisine.

Fenugreek leaves helps increase the good-cholesterol levels (HDL-C), the seeds helps ease stomach aches and I've heard that fenugreek helps new mothers boost lactation capacity.

But be careful not to use too much of fenugreek as they leave a bitter taste in the end-product.

Methi Parathas / Teplas

What you need to make Methi Parathas / Teplas -

Fresh Fenugreek leaves

  • Methi / Fenugreek leaves/ Mendaya Keerai - 1 and 1/2 cups
  • Spring Onions - 1/4 cup (chopped) - Just my addition, you could skip if you do not have them in hand! They do add to the taste though.
  • Whole wheat flour - 4 cups
  • Green chillies - 2 (finely chopped)
  • Ginger (shredded) - 2 tsp
  • Coriander powder / Dhania - 2 tsp
  • Cumin + pepper powder (Milagu-jeera podi) - 3/4 tsp
  • Red chilli powder - 1/2 tsp (Adjust to your preference, according to the hotness of green chillies)
  • Omam (Ajwain seeds ) - 1 tsp
  • White sesame seeds - 1 tsp (Gives added flavor)
  • Turmeric powder - 1/2 tsp
  • Sugar - 1/2 tsp ( to counter the bitterness of methi)
  • Salt - to taste

  • Water - as required (~ 1 cup)
  • Oil - 2 tbsp
  • Yogurt / Fresh curd - 2 tbsp
  • Ghee - 2 tsp (optional)

How To Make the Dough -


  • First wash the fenugreek leaves (shake off excess water) and remove the leaves alone discading the stalk.


  • Take whole wheat flour in a big mixing bowl and add all the ingredients listed above, upto salt. Add water, in steps and mix everything together to form a dough.  Add yogurt as well. Keep kneading and bring all the flour together, adding water as and when required. Add oil towards the final stages and get a soft, pliable dough. Cover the bowl and let rest for an hour.

The dough is ready!


To Make Teplas -


  • Flour a clean, dry surface, take a lemon-sized ball of dough and roll it into a circle using a rolling pin (also floured). Sprinkle flour in between to prevent the tepla from sticking to the surface or the pin. Repeat until the dough is all used up. The quantities given yield about 12-14 teplas. 


  • Heat a tawa and place a rolled-out tepla on it. When the underneath surface starts to show brown spots (in about 10 seconds), flip it and press the corners with a flat wooden spatula. Flip again after 10 seconds and ensure the teplas are cooked well. Finish with a drop (or two) of ghee on each tepla for that enhanced taste! :-)


Store the teplas covered with aluminum foil in a keep-hot casserole.

Teplas are best enjoyed with Yogurt!

Serve with fresh yogurt (plain)/ curd. You can also make dal or any simple gravy to go with these. I can eat this for breakfast, lunch or dinner (of course, not all 3 times on the same day, too boring :P ).

Theplas stay good for about a week. I used to make a big batch of these on Sundays when I had exams the following weeks.You might want to heat them up again on a hot pre-heated tawa (microwaving doesn't yield great results according to me, unless you're gonna eat it immediately) before serving.


Thursday, December 8, 2011

Punjabi Cholé aka Channa Masala (Chick peas cooked the Punjabi way)

I love Garbanzo beans in any form, I add them to salads, love it fried n crispy and Kadala Kozhambu is my favorite :)

Recently, I made Cholé Masala for a friend since she loves Punjabi food in general. I have made Cholé earlier but I felt there was something different in the authentic Punjabi version. The reason - lack of freshly roasted and ground spices :) Yes, store-bought channa masala powder alone does not suffice! I searched quite a bit in my quest for the authentic taste and noted down points from many of them that I thought would make a difference to the end-result. Now, here I am, sharing with all of you, all that I incorporated into my Punjabi Cholé. I am happy to mention that it was a hit with my guests! :)

Punjabi Chole

What I Used -


White Channa (Chickpeas / Garbanzo beans) - 1 and 1/2 cups
Tea Bag - 1 (to give chickpeas a nice, dark color)
Bayleaf - 1
Salt - to taste
Turmeric - 1/2 tsp

Butter - 1 tbsp
Omam / Ajwain / Carom seeds - 1 tsp ( helps to prevent gas formation because of channa)

Onions - 2
Ginger-garlic paste - 1 tsp
Channa Masala - 2 tsp (MDH or your favorite brand)
Tomatoes- 2 (medium)
Tomato puree - 2 tbsp

Whole Spices - to be roasted until a grand aroma fills your nostrils and then powdered coarsely


Coriander seeds -2 tbsp
Cinnamon - 1 stick
Cloves - 5 nos.
Cardamoms - 3 nos.
Peppercorns - 8 nos.
Cumin / Jeera - 2 tsp
Whole Red chillies(dried )- 2
Fresh green chillies - 2 (slit)

To garnish -


Coriander leaves (Cilantro)
Lemon (sectioned)
Tomatoes

How I Made It -


I have listed the ingredients in the order (except for the spice list at the end) that I would use them in the recipe. I reckon that it makes the recipe user-friendly. Isn't it so? Let me know if otherwise :)

Let's start with the preparatory steps. Yes, you need to make up your mind atleast the previous night if you're planning Cholé Masala for the next day. Soak the channa with lots of water and let them rest overnight (about 8 hours).

  • Pressure-cook CholĂ© with salt, turmeric, a bayleaf and a tea bag for about 8 whistles. Yes, CholĂ© needs to cooked very well. The tea-bag and the bay leaf can be removed after cholĂ© gets cooked. Remember to discard the soaking water and cook with a batch of fresh water. This actually applies for any kind of beans/lentils.

  • Take a kadai / deep pan. Melt butter and temper with carom/ ajwain seeds.Add the chopped onions and fry till it turns golden-brown. Add ginger-garlic paste and fry till the raw smell vanishes. Now comes the star of the recipe - the freshly roasted and ground spices! I started with dry-roasting the spices and powdered them coarsely, after letting them cool a bit first.

  • Now your kitchen would be filled with such an awesome smell, thanks to the spices! I also added 2 tsp of Channa Masala as I didn't have Pomegranate powder or even Aamchur (Dry mango powder).  Add chopped tomatoes and let them get mashed. Then add tomato puree and let the whole thing become soft and mushy. Feel free to add a little more oil if your pan is drying out.

  • By now, the pressure would have released from the cooker and you can open it. Drain the water from the cooked cholĂ©. Don't throw the water yet. My friend, Pri, often tells me this is cholĂ© stock and must be put to good use in the CholĂ© Masala recipe. She is right! It does make a big difference!

  • Add cholĂ© to the pan. Mash about 2 handfuls of the cooked cholĂ© and leave the rest as such. This helps to make the gravy thicker. Add some cholĂ© stock (water); I add in steps to make sure my CholĂ© does not become runny! Mix everything together and let the cholĂ© absorb the spices well. I closed the pan for about 5 minutes. Uncover and check (and adjust) for salt and spice levels. The hotness from red and green chillies was enough for me, you may add some red chilli powder / cayenne pepper if you want it to be hotter! Add some more water/stock and cook for 3 more minutes, if required.

Channa Masala

That's it :) You've made it! Garnish with fresh cilantro or lemon or some tomatoes! Time to dig in :)


Cholé Batura (deep-fried Indian bread) is a classic combination. Cholé goes wonderfully well with Parathas, Kulchas and all Indian flat breads. If you're having it with rice, make the gravy slightly watery.

P.S : I did not have time to take step-by-step pictures as I was multi-tasking that day and busy preparing Paneer-Cabbage stuffed Parathas, Pulao and some really nice Shahi Paneer with Mixed Veggies, along with CholĂ©, all within 2 hours!  You already know what my next posts are gonna be :)


Friday, November 11, 2011

North Indian Kichdi - One-pot meal

I had to come to Singapore amd learn from a North-Indian friend that Kichdi means something totally different in the North!  Did I mention that I have lived all my life in the South :)

For those from South India, its nothing but Rawa Upma with Veggies of your choice. But, to our friends up in the North, it's a delicious medley of rice, dal and sometimes, veggies get added too. This is Pri's comfort food, and now it's mine too :)

North-Indian Kichdi

Some of us may figure out its close resemblance to Pongal, but there are remarkable differences between the two. 1. Only Moongdal for Pongal, Kichdi can be with any dal, typically Toor/Tuvar Dal. 2. No veggies in Pongal 3. The spices are different. And there are many more...you'll see soon :)

Kichdi has become my favorite week-night dinner becoz its super-quick and high in nutritional value - Rice for Carbs, Dal/Lentils for Proteins, Veggies for Vitamins - all in one. I have even tried Kichdi with half brown rice and half white rice and it tastes fantastic! Of course, I love brown rice :)


Yield - for 2 adults
Active Time Spent - 10 minutes

You Need -


  • Oil / Ghee - 1 tsp
  • Jeera/Cumin seeds - 1 tsp
  • Garlic - 3 pods (finely chopped) (Optional)
  • Ginger (finely chopped) - 1 tsp
  • Onion, chopped - 1
  • Green chillies - 4 (chopped) (Adjust to your taste)
  • Tomato, chopped - 1
  • Coriander powder - 2 tsp
  • Jeera + Pepper powder - 3/4 tsp
  • Turmeric powder - 2 pinches
  • Rice - 1 cup 
  • Tuvar Dal - 2 handfuls
  • Salt - to taste (~1 and 1/2 tsp)
  • Water - 4 cups
  •  Veggies of your choice : 
                I have used 
                     Spinach -  1 cup, packed (washed and coarsely chopped)
                     Carrot - 1 (medium sized, cubed)

              Feel free to add -

                    Potatoes, Green peas, French Beans,


Tadka :

Ghee - 1 tsp
Mustard - 1 tsp
Curry leaves - a few


How To -


  • Take your pressure-pan (or any frying pan), heat oil/ghee and do tadka with mustard and curry leaves. Keep aside.

  • Now, heat some more oil/ghee and start adding ingredients, in the order listed, starting from Jeera. Wait for a few minutes while frying garlic and onions for the raw smell to vanish. 
  •  Fry at each stage, for a minute each.
  • Wash and rinse rice and dal (separately) and add to the pan.
  • You need not chop vegetables fine, as they will get mashed up in the pressure cooker eventually.

  • Increase quantity of water if you're using brown rice.

  • Pressure-cook for 4 whistles and wait until all the pressure subsides.


Finish with tadka/ tempering.
Enjoy it hot with potato chips or appalam / papad or just plain!  My husband prefers raitha (cucumber-yogurt dressing) to go with this Kichdi.


Kichdi with Maracheeni Appalam

This is my fav goto-dish on a tired week-night. What's yours?


Monday, September 26, 2011

Beans -Paneer Malai Sabji (French Beans and Indian Cottage Cheese in Creamy gravy)

This is a wonderful way to include French beans in your diet. Who doesn't like to eat a creamy gravy with soft cottage-cheese cubes in it?

I learnt this recipe from Geetha chithi and immediately tried it. Loved it and so did my hubby, who doesn't eat beans thuvaran or anything with Beans as the major veg. This is simple to make and tastes yummilicious :) It's also different in that, this sabji does not need the ubiquitous tomato-onion base that most North-Indian gravies come with.

This post has been pending for a long time and now, when a friend of mine asked for some easy North-Indian style recipes to whip up quickly, I am sending this one.

Beans-Paneer Malai Sabji with Garlic Rice


Time - 25 minutes
Yield - 2 to 3 adults

You Need -


French Beans - about 15 (chopped into 1" pieces)
Paneer cubes - 150 g
Potatoes - 1 medium (optional, I didn't add any)

Set A -

Turmeric powder - 1/2 tsp
Dhania/Coriander powder - 1 tsp
Jeera/Cumin powder - 3/4 tsp
Green chillies (slit) - 2
Hing/Asafoetida - a pinch
Red chilli powder - 3/4 tsp (Adjust according to your spice tolerance level)
Salt - to taste
Sugar - 1/2 tsp
Fresh Cream or Malai - 5 tbsp


Nestle Cream works too.

To Temper -

Oil - 2 tsp
Whole Jeera - 1 tsp

To garnish -
Fresh Coriander leaves

How To -


  • Take a kadai, heat 1 tsp oil and allow jeera to splutter. Try to spread the oil all around the sides of the pan.
  • Add slit green chillies, beans, thawed paneer cubes (and potato, if you would like to) and all the spices from Set A along with fresh cream, in the quantities mentioned.
  • Mix well and cover the kadai with a lid completely. This is to allow the veg to get cooked, plus get the creamy flavor infused in it in a lovely way :) Please turn the gas mark to Sim/Low.
  • After 8-10 minutes, open the lid, the cream would have melted and the beans is now well-cooked.
  • Check for salt and spice levels.
  • If the veggies do not come together with the gravy, sprinkle some rice flour (~ 2 tsp) while stirring simultaneously. Rice flour binds them all together and the cream now coats the veggies uniformly. Do not add too much of rice flour as it will spoil the rich taste that malai (cream) lends to the gravy.
  • Garnish with finely chopped coriander leaves.

I served this sabji with Garlic rice and we both liked it :)


Saturday, April 16, 2011

Sweet Potato Parathas

Potatoes have a bad reputation because of their high-carb content, but sweet potatoes are so full of anti-oxidants because of their high levels of Vitamin A and C.  They also have good amounts of Vitamin B6, potassium, iron and manganese. So, don't feel guilty if you love Aloo parathas, go ahead and enjoy some parathas with all the goodness of sweet potatoes.


What You Need -

Wheat flour - 3 cups
Sweet potatoes - 250 g
Jeera powder - 1 tsp
Coriander powder - 3/4 tsp
Turmeric powder - 1/4 tsp
Salt - to taste
Oil - 1 tsp

I haven't added Red Chilli powder as I wanted to relish the sweetness of sweet potatoes. They say that the flavor of sweet potatoes actually improves with storage, as some of the starch turns into sugar.

How To -

  • Pressure-cook sweet potatoes and allow to cool slightly.
  • Make the dough with wheat flour, salt, mashed n cooked sweet potatoes, salt, turmeric, jeera powder and coriander powder. 
  • You do not have to add water at all. 
  • Finally, add 1 tsp of oil so that the dough is not sticky. 
  • You can feel that the dough is softer than normal chapathi dough.
  • Wrap it in Cling Wrap foil and keep aside for atleast 30 minutes.


  • The procedure then is quite normal; divide the dough into balls and roll it into circles with rolling pin.
  • Do toss the dough into some wheat flour, during the rolling process, so that it doesn't get sticky.
  • Heat a griddle and cook the parathas on both sides.
  • The trick is to keep the paratha moving with a wooden spatula, so that it remains soft yet gets cooked.
  • Store the parathas by covering them in a kitchen cloth inside a hot pack casserole. These remain soft long after you make them, which makes them ideal for lunch boxes :)


Any spicy gravy like Kadai Vegetable would complement the sweetness of these parathas.

Sunday, March 27, 2011

Malai Kofta (Deep fried paneer & potato dumplings in rich creamy sauce) - Step-by-Step recipe

Malai Kofta is a rich dish popular in North India, originally from Punjabi cuisine. It's very delicious, loved by everyone and best suited for lunch/dinner parties. Who wouldn't like something that has paneer, cream and potatoes in it? ;)

My hubby loves Malai Kofta :)  Sadly, the only Indian restaurant closest to our place doesn't list Malai Kofta on its menu.  Hence, I have been wanting to try and make this at home for a long long time. Inspired by Geetha chithi's mouth-watering pictures and simple recipe, I was much tempted and finally made this today for lunch.  I modified the recipe slightly and was immensely happy that it came out very well and we both enjoyed our meal. I served it with chapathis but Malai Kofta goes equally well with rice varieties.

Malai Kofta


What You Need -


For the Koftas -


Paneer - 150 g
Potatoes - 3 small/medium
Green chillies - 3 (finely chopped)
Jeera/ Cumin seeds - 1 tsp
Black pepper powder - 1/2 tsp
Salt - to taste
Raisins - as required

Maida/All-purpose flour - 4 tbsp (Can substitute with corn flour)
Oil - for frying

For the gravy -


Onions- 2
Tomatoes - 2
Ginger-Garlic paste - 1 tsp
Cashewnuts - 12  nos.
Raisins - 20 nos.

Turmeric powder - 1/2 tsp
Coriander powder - 1 tsp
Garam masala - 1 tsp
Red chilli powder - 3/4 tsp
Salt - to taste

Cream - 4 to 5 tbsp
Cilantro - to garnish

How To -


  • Boil potatoes. Peel the skin and mash them.
  • Mash paneer and mix it with mashed potatoes, along with chopped green chillies, jeera, pepper and salt.


  • Mix maida in some water. This makes our batter. 
  • Divide the dough into small ping-pong sized balls. 
  • Stud each ball with 3-4 raisins.
  • Dip and roll the balls into maida batter and deep fry in hot oil.

  • Make sure the oil is hot enough else the balls might disintegrate!

  • A batch of 4 koftas would take about 5-7 minutes to get cooked and fried enough on all sides. You can remove and drain the koftas on kitchen tissues when you see them turning golden in color.
Golden Koftas - yummy as such :)
  • These are just yummy as such and you can eat them right away with tomato-ketchup or any chutney :) But, save them if you want to eat them with the rich creamy gravy!

  • To make the gravy, you need 4 kinds of pastes/juices. 
(1) Soak chopped onions in hot water for 15 minutes and grind them to a paste

(2) Blend ripe tomatoes in a juicer
(3) Ginger-garlic paste (you can go with the store-bought version too)
(4) Soak cashews and raisins in hot water for 15 minutes and grind to a paste

  • Take a kadai, heat 2 tsp of oil and fry the onion paste and let it cook for 5 minutes.
  • Next goes the ginger-garlic paste.
  • Now, add tomato puree and add salt.
  • Follow with all the masala powders - turmeric, garam masala, coriander and red chilli powder. Let boil.
  • Once all these are well incorporated, mix in the cashew+ raisins paste and boil for another 2-3 minutes. 
  • Finally, add in cream and garnish with coriander leaves/cilantro.

To Serve : Pour the gravy over the koftas just a few minutes before eating, to prevent them going soggy. I like soaked koftas in my gravy, so I soaked just 2 koftas right from the beginning and then crumbled them in the gravy. This also gives some thickness and texture to the gravy.


Happy to send this to Sinful Delights! Very apt description, indeed for Malai Kofta :)


LinkWithin

Related Posts Plugin for WordPress, Blogger...