Showing posts with label International. Show all posts

Tuesday, May 26, 2015

Low fat Fruit and Nut Cake ~ Christmas Cake - Butter-free, Eggless cake :-)

Nowadays, I am inclined towards fat-free baking. True, we cannot avoid sugar in cakes, but we can minimize them by adding natural sources of sweetness. What do we do for butter? Substitute with natural sources of fat, that are good for your heart.


Guilt-free Fruit & Nut Cake 


Here's my Low fat Fruit & Nut cake that absolutely delicious and nobody can tell its butter -free or has no plain flour.


I've adapted the recipe from maria's menu but made it healthier by using Avocados and 100% whole wheat flour in place of Maida / All purpose flour/Plain flour. Read on ...

Ingredients:


2 Avocados - ripe (dark green in color)
Whole wheat flour - 1.5 cups
Brown sugar - 1 cup
Dry fruits (like raisins, tutty fruity, apricots, figs, ) +
Nuts (I used chopped almonds and cashews) = totally 1 and 1/2 to 1 and 3/4 cups roughly
Fruit juice (I have tried both Apple juice and Cranberry juice with good success)
Hot milk - 1/4 cup
Yogurt - 1/2 cup
Vanilla essence - 1 tsp

Baking powder - 0.5 tsp
Baking soda- 0.5 tsp
Cardamom powder - 1 tsp
Cinnamon powder - 0.5 tsp
A pinch of salt


Preparation -


  • Soak the dry fruits in the fruit juice overnight.
  • Drain the juice( save it so you can drink later!) and take  the soaked fruits and nuts in a bowl.
  • Coat it with 2 tbsp of flour roughly.


  • Start by pre-heating your oven to 180 degrees.
  • Sieve the flour along with a pinch of salt and baking soda, baking powder --> all dry ingredients. Add cardamom and cinnamon powder.
  • Beat the avocados (pitted) with sugar in a mixie.


  • Add hot milk to yogurt and mix this to the avocado-sugar mixture. Sure, the batter appears curdled at this stage but fret not!
  • Add vanilla essence as well.
  • Slowly mix the sieved flour mixture into the wet batter mixture until well-incorporated. You can add more chopped nuts at the stage. I like to add some walnuts :-)


Batter ready to go into the oven! 

  • Prepare a pan by lining with baking paper. Pour the batter and let the oven do the magic :-)

  • Do check after 20 minutes using a toothpick to see if the cake is done/ nearing doneness. If its too wet, let bake for another 5 to 10 minutes. Adjust timing by checking every 5 to 7 minutes. If the top is brown but the insides are uncooked/wet, then cover with an aluminum foil so that the top doesn't get burnt.


Just out of the oven! Heavenly goodness!

Enjoy your cake guilt-free :-)

This is suitable even for heart patients as there is no butter or oil added.

This year (26th Dec 2015), I made this lovely cake again for a potluck party and it was a big hit!!
Some photos -
Christmas Cake

Shopped for dry fruits and nuts and candied fruits :-)


Sunday, July 7, 2013

Basil Pesto - Simply Italian - Made in 5 minutes

I instantly fell in love with Pesto when I tasted it for the first time - in Rome! Yes, the most authentic Pesto one could ever get! Earlier, I knew that pesto is analogous to Indian "thogayal" and that, it is very simple to make. But when I tried it myself, I was really amazed at the wonderful flavor that comes when we put together fresh basil leaves, olive oil, pine nuts and some parmesan!  It is one easy recipe that even a beginner could get right easily! :-)

Ingredients -

 1/2 cup basil leaves
 3 tbsp pine nuts
 3 tbsp pure olive oil
 1 garlic clove
 1 tsp lemon juice (freshly squeezed)
 3 tbsp Parmesan cheese
 a pinch each of sugar, salt and pepper

Method -

Blend basil leaves, pinenuts and garlic in a food processor.

Add olive oil, lemon juice, salt, sugar and pepper and blend again. You can freeze this paste at this stage if you're not planning to eat pesto today.

When required, bring close to room temperature and blend with parmesan cheese! Voila! All you now need is to cook some pasta. Saute the prepared pesto with a little bit (~ 2 tsp) of olive oil and let pesto coat the pasta well! Bon Appetit! :-)


Elbow pasta with Pesto


Reference : http://www.pickyourown.org/pesto.php

Saturday, July 6, 2013

Mango Shrikhand - Creamy Sweet Mango Yogurt with crunchy nuts :-)

The Mango season is about to be over and now I rush to the Indian store to grab a few and make some Mango specialties :-)  I have been thinking of making Shrikhand at home ever since I shortlisted it as a fat-free recipe (basically if u make yogurt with fat-free milk, that is :P)  Finally, got around to make this delicacy for my hubby who said it's equivalent to Meiji/Marigold Mango yogurt :-) That's a compliment, I suppose! :-)

Mango Shrikhand

Yield - 4 ramekins (as in the picture)

What You Need-


Ripe Mango - 1 (medium size)
Fresh Yogurt/ Curd - 1 litre
Sugar - 3 to 4 tbsp (adjust according to the sweetness you prefer)
Cardamom powder - 1/4 tsp
Nuts of your choice - I used Almonds and Cashews

Mango Shrikhand

Procedure -


1. Make Greek Yogurt following the procedure here. This takes 6-8 hours in the fridge. But you don't have to do much actively!
2. Blend mango in a mixer and get the puree.
3. Powder sugar.
4. Mix in powdered sugar, cardamom powder and the mango puree into Greek Yogurt and whisk them all together until you get a smooth texture. This is reallly important.
5. Chop some nuts and mix them too. Almonds would need to be blanched. Pistachios would be awesome, but I didn't have any yesterday. Reserve some nuts to garnish on top later.
6. Pour into ramekins or ice-cream cups and decorate with nuts. Refrigerate for another 3 hours to let it set well.
7. Serve chilled.

Simply awesome! Don't go by my words, try for yourself :-)

Umm...Slurp!


Sunday, October 14, 2012

Badam Ladoo/ Laddu - No sugar or ghee added! - 5 Minute Recipe!

You can make Badam Laddu without sugar (in fact no extra sweetener added) or ghee! Did you know that? Well, I didn't know it too, until a good friend of mine, Karpagam aunty told me the secret! She let me taste the laddu first and then told me that it's a single ingredient sweet!!! I couldn't believe it! Absolutely yummy and so easy to make!

So full of nutrition (good cholesterol), it is great for both kids and adults alike to eat a laddu a day! :-) This is an easy, healthy and a really quick recipe :-) What are you waiting for!!


What You Need -


A cup of badam or raw almonds

That's it!!! :-) No, I'm not joking :-)


How To -


  • Spread the raw almonds on a microwaveable plate and microwave for 2-3 minutes. The heat helps to release the natural oils in them. Alternatively you can toast them on a tawa too, but be careful not to burn them.
  • Let cool.
  • Take your mixer (the one in which you powder dry ingredients) or coffee grinder and powder the almonds. don't bother if it's a bit coarse! That will add some crunch too!
  • Transfer to a wide plate and make them into small round balls (typical size of laddu you would make). You don't need to add ghee for binding, they come together easily with the inherent oil in them. Be patient, you have to hold each laddu tightly for a good 30 seconds to 1 minute to help them keep the shape.

Enjoy!!!


Notes -


  • You may add a teaspoon of warm milk to bind, but that would lessen the shelf life a lot - you can't keep for more than 2 days! 
  •  With 150 to 180 grams of almonds, I got about 10 laddus.  I had opened the pack earlier and used for making something else (or just gobbled up a few plain!) so I had less than 200 grams for preparing these laddus.
  • If you still don't trust my words, make just 1 laddu and taste it and check for yourself if the sweetness level is sufficient. If really required, powder 2 tbsp of sugar and heat & add 2 tsp of ghee to suit your tastebuds.

What healthy recipe did you recently experiment on and were satisfied with? Please share with me! :-)


Tuesday, February 14, 2012

Quinoa Salad - Quick, healthy and fulfilling breakfast/supper


What's Quinoa ?


Quinoa (pronounced "keen-wah") is a grain-like crop grown for its edible seeds. It's a highly nutritious carbohydrate, that helps you to stay lean as well as maximize your energy levels at the same time. Its nutritional profile is similar to that of brown rice, but quinoa is higher in protein. Quinoa is great for cardio-vascular health, boosts your anti-oxidant levels, reduces the risk of gallstones, full of fiber and could help lower migraine. It's gluten-free and cholesterol-free! Most importantly, it's delicious!


How to cook Quinoa ?


First, it is essential to rinse quinoa atleast 3 times by changing water, in order to get rid of the bitter taste from the saponin coating. It's cooked much like rice, with twice the volume of water (or slightly less). It can be cooked in a closed pan or a rice cooker or a microwave. When cooked, quinoa is fluffy, crunchy and a little creamy!


Here's a simple salad with veggies, fruits and nuts added to cooked quinoa. This is one of the quick ones I make whenever I want to stay away from Indian masalas, yet eat something tasty. Feel free to add or deduct veggies, fruits and nuts to suit your family's taste buds! :-)


Nutritious & delicious Quinoa salad - So easy to make!


Yield - 2 people


Prep time + cooking time - 25 mins


What I Used for the Salad-


Quinoa - 1 cup (rinsed)
Water - 1 and 3/4 cup
Olive Oil - 1 tsp


Onions - 2 (chopped)
Garlic -  4 pods, finely chopped
Carrot - 2 medium (cubed)
Cucumber - 1 (chopped)
Tomatoes - 3 (chopped)
Fresh Coriander leaves - a small bunch, finely chopped


Apple - 2, cubed
Raisins - about 50 grams
Cashewnuts - a handful
Hazelnuts - 2 handfuls

Salt - to taste
Pepper - 1 tsp
Asafoetida - 2 drizzles

Add ons :

Pine nuts - toasted
Peanuts - roasted
Strawberries - fresh!
Feta cheese! 


How To -

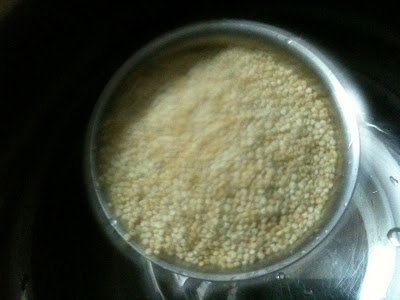
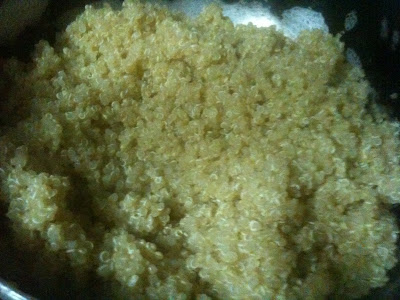
  • Boil water with a drop of oil in a pan. Meanwhile, rinse quinoa about 3 times to get rid of the foamy saponins. This step is important, else you'll end up with bitter-tasting quinoa. Add rinsed quinoa to boiled water and close the pan. In 12 to 15 minutes, it's fully cooked (all the water is absorbed) and looks fluffy with thin white rings around. Let the cooked quinoa cool for atleast 10 minutes.
 

Quinoa, rinsed with water


Cooked quinoa


  • Heat about 1 tsp of olive oil and fry garlic and onions slightly. Don't brown them. 

  • Toast the nuts on an oven or a tava without any oil.

  • Peel the veggies and chop them ready. Cube apples.

  • Take a big salad bowl, add the slightly fried onions, garlic and all the chopped veggies, apples, nuts, raisins and sprinkle required salt, pepper and a little asafoetida. Toss everything gently. Squeeze some lemon juice if desired.


Healthy n tasty Quinoa salad

Enjoy this sumptuous salad for breakfast or dinner!


Thursday, October 20, 2011

Mexican Dinner - Vegetarian Bean Burritos - Step-By-Step

I was introduced to Mexican cuisine by my hubby when we were in the US. He loves TacoBell and used to order dinners "to-go" once every fortnight, atleast.  In fact, Bean Chalupas and Burritos were the first meal we had together when I arrived in the US soon after we were married. We dropped our baggage at home and off we went to the nearest Tacobell drive-in. Ummm...Beautiful memories :) and yummy food :)

Here, in Singapore, Boat Quay area has a good Mexican place that we love to go to. But it's not so often that we get to eat Mexican. I have been wanting to try it at home and here's my first attempt. Not bad! My hubby liked it and even agreed to pack it for lunch the next day :)

It's not really exotic per se and does not require any special Mexican ingredient as such. Sour Cream or Cream Cheese or some Cheese is all you need, apart from what's commonly found in an Indian kitchen. Tortillas or Burritos would be available in the grocery stores and you just have to warm them up in a tawa or microwave (However, I don't like microwaving method as it tends to become crisp very soon). Do give this recipe a try and let me know how you like it :)

Vegetarian Burritos

A native Mexican should tell if this is the real burrito they make. As for now, this is my way of making Burrito. I shall edit the post as I improvise, when I try it a few more times :)


What I Used -


Onion -1
Green capsicum/bell pepper - 1/2
Yellow capsicum/bell pepper - 1/2
Red capsicum/Bell pepper - 1/2 (I didn't have this)
Garlic - 4 pods
Red beans (Rajma) - 1 cup (soaked, cooked and rinsed)

Spice powders -


Cumin powder - 1 tsp
Coriander powder - 1 tsp
Red chilli powder / Paprika - 1 tsp
Salt - to taste
Pepper - to taste


Cream Cheese - 3 tbsp (Sour Cream would taste even better)
Fresh coriander/ cilantro - a small bunch

Oil - 1 tbsp

Burritos / Tortillas - 4

How To -


Discard the stem and seeds from the capsicum/bell pepper and chop them fine.

Chop onions finely. Mince garlic.
Take a nonstick pan, heat oil and fry onions until soft.

Add garlic and then fry for 2 mins.
Add chopped bell peppers.

Add salt required for the veggies and close the pan for 3 mins.
Add the spice powders.

Now, mash the pressure-cooked red beans (rajma) coarsely. It's ok to leave a few beans as such, here and there.

Add the mashed beans. Mix well and cook for 3 mins.
Finally add cream-cheese and mix.

Garnish with fresh coriander leaves/cilantro.

Take your dosa kal/ tawa and warm the tortillas/ burritos on both sides for 10 - 20 seconds each. No oil please.

Spoon the filling mixture on the warm tortilla and roll it up. Repeat for each one.

Vegetarian Bean Burrito


Burritos, rolled up and ready


I served these burritos with Thai Sweet Chilli sauce (bcoz that's what I had, at the moment). Some fiery tomato-chilli sauce or Salsa would also go well together, attesting that this is spicy Mexican indeed :)  You may add some Salsa to the filling itself, if you like.  How about the Indian version of Salsa (Tomato thokku) ? This might appeal to the Indian palates, I guess :)

Absolutely filling and delicious Burritos

Sending this to Global Food Festival at Sizzling Tastebuds

Monday, September 26, 2011

Healthy Minestrone Soup - Vegetarian

If you love Italian food, if you're a fan of Olive Garden, you're sure to love Minestrone Soup. It's very flexible in that you can add whatever veggies you have in hand, just add macaroni cooked al dente and don't forget the red beans and/or white beans. Very healthy and delicious. Bon Appetit!

Vegetarian Minestrone Soup


What I Used -


Elbow Macaroni - 2 handfuls
Red Kidney beans / Rajma - 2 handfuls (Soak overnight with triple the volume of water)
Olive Oil - 2 tsp
Red Onion - 1
Garlic - 2 cloves
Carrot - 1
Frozen Mixed vegetables (Beans, Peas, Corn and it had carrots of course!) - 2 handfuls
Celery - 4 stalks (chopped)
Ripe Tomatoes - 4
Mixed Italian herbs (dried) - 1 tbsp
Ground Black Pepper - 1 tsp
Salt - to taste (~ 3/4 tsp + 3/4 tsp)
Water - as required


Feel free to add -

Navy beans/White beans - a handful or 2
Potato -1 (small cubes)
Zucchini -1 (half lengthwise and slice)
Bell pepper/capsicum - 1 (diced)
Baby spinach (finely chopped)


How I Made Minestrone Soup -


  • In a large pot (Small pressure cooker pan works for me! ), sautĂ© chopped onions and garlic in olive oil for 3 minutes on medium flame. 
  • When the onions are a little softer, add celery, carrots, beans, peas and corn  (all chopped vegegies) and sautĂ© for 2 minutes. 
  • Finely chop 1 tomato and add to the pan.
  • Extract the juice of 3 tomatoes in a blender and add to the pan.
  • Add the soaked Red kidney beans, salt, pepper, Italian herbs and pour about 1 1/2 to2 cups of water.
  • Pressure cook for 3 whistles and switch off. 
    • If you do not have a pressure-cooker, use a slow cooker, so that the flavors evolve and mix well.

  • In the mean time, cook pasta (Elbow macaroni or other) in salted water until al dente. Don't overcook the pasta. This is precisely why we did not add the pasta to the pressure-cooker!

  • Add the cooked pasta to the veggies sauce and heat on medium flame for 3-5 minutes (Need not boil). 
Minestrone Soup

Serve your minestrone soup with some fresh Garlic bread :)

Variation : You could use alphabet-shaped pasta and your kids can have some fun while they eat nutritious food!

This is my entry to Soups and Salads Mela hosted by Srivalli and Global Food Festival at Sizzling Tastebuds

Sunday, July 24, 2011

Roasted Red Pepper/Capsicum Soup - Italian style - Step-By-Step Recipe

My hands have been itching to try this soup ever-since we relished it at a restaurant in Trastevere in Rome.  This is a hearty soup that fills you up so much that half-a-sandwich is good enough to complete your meal. There is no cream or milk added, so this is absolutely vegan and really really healthy and low in fat!

Roasted Red Pepper Soup - Hearty Italian Soup


I tried to re-create the taste with whatever tools and ingredients I had in hand and it was delicious and fulfilling! The quantities I have given below are good for 2 adults.

Ingredients -


Red peppers - 2 medium/big
Garlic - 8 pods
Onion - 1 medium
Tomato - 1 medium
Italian spices - 1/2 tsp
Salt - to taste
Pepper pods - 8, to be crushed
Red Chilli flakes - 1 tsp (from 3 dry chillies)
Sugar - 1/2 tsp (optional)
Olive oil - 3 tsp
Water / Vegetable stock- 1 cup

Procedure -


  • Wash and clean red peppers with water. 

  • Roast one-by-one by placing them directly on the flame. (Folks who have an oven might find it easier to grill/broil them). 

  • Turn them around so that the whole surface turns black and you can spot blisters. 

  • Carefully transfer the blackened pepper/capsicum into a bowl and close it with a lid. In 5 minutes, the condensed water will soften the skin and you can easily peel off the black skin by showing it under running water. Trust me, it worked perfectly for me, even the very first time!
  • Take a pan, heat olive oil and fry chopped onions and garlic till onions turn pink.
  • Tear the soft capsicum/red pepper into big pieces and fry them together with onions and garlic. Remember to de-seed the core.
  • Add salt, crushed pepper, Italian spices and chilli flakes. Add 1/2 tsp sugar if you want to.

  • Cube tomato and add to this. Fry for 2 minutes.
  • Add 1 cup of water or vegetable stock and keep covered with a lid for 10 minutes.
  • Use a hand blender or an electric mixer to blend them all together into a puree. I used the versatile Indian mixer that my mom gave me.

  • If too thick, add 1/2 cup water and boil again for 3 minutes et Voila!

  • Add toasted bread to the soup, if you like!

Bon Appetit! :)


This is my entry to Soups and Salads Mela hosted by Srivalli

LinkWithin

Related Posts Plugin for WordPress, Blogger...