Showing posts with label crunchy. Show all posts

Sunday, October 14, 2012

Badam Ladoo/ Laddu - No sugar or ghee added! - 5 Minute Recipe!

You can make Badam Laddu without sugar (in fact no extra sweetener added) or ghee! Did you know that? Well, I didn't know it too, until a good friend of mine, Karpagam aunty told me the secret! She let me taste the laddu first and then told me that it's a single ingredient sweet!!! I couldn't believe it! Absolutely yummy and so easy to make!

So full of nutrition (good cholesterol), it is great for both kids and adults alike to eat a laddu a day! :-) This is an easy, healthy and a really quick recipe :-) What are you waiting for!!


What You Need -


A cup of badam or raw almonds

That's it!!! :-) No, I'm not joking :-)


How To -


  • Spread the raw almonds on a microwaveable plate and microwave for 2-3 minutes. The heat helps to release the natural oils in them. Alternatively you can toast them on a tawa too, but be careful not to burn them.
  • Let cool.
  • Take your mixer (the one in which you powder dry ingredients) or coffee grinder and powder the almonds. don't bother if it's a bit coarse! That will add some crunch too!
  • Transfer to a wide plate and make them into small round balls (typical size of laddu you would make). You don't need to add ghee for binding, they come together easily with the inherent oil in them. Be patient, you have to hold each laddu tightly for a good 30 seconds to 1 minute to help them keep the shape.

Enjoy!!!


Notes -


  • You may add a teaspoon of warm milk to bind, but that would lessen the shelf life a lot - you can't keep for more than 2 days! 
  •  With 150 to 180 grams of almonds, I got about 10 laddus.  I had opened the pack earlier and used for making something else (or just gobbled up a few plain!) so I had less than 200 grams for preparing these laddus.
  • If you still don't trust my words, make just 1 laddu and taste it and check for yourself if the sweetness level is sufficient. If really required, powder 2 tbsp of sugar and heat & add 2 tsp of ghee to suit your tastebuds.

What healthy recipe did you recently experiment on and were satisfied with? Please share with me! :-)


Wednesday, January 11, 2012

Maddur Vada - Karnataka specialty

Maddur Vade/Vada is a popular Karnataka specialty and you'd have definitely had it if you have ever been on the Bangalore-Mysore train route. This one is a crispy crunchy snack that adults and kids alike will love to munch on! I had the opportunity to discover Kalyani's blog as part of my participation in Blog Hop Wednesdays event. I picked this recipe as I wanted to try a dish unique to a particular region. Kalyani has a beautiful blog with diverse recipes and tempting food pictures and I found her stories prior to every recipe to be very interesting!

I made Maddur Vade in about 30 minutes and it was finger-lickin' good! :)

Maddur Vade

You 'll Need -

Maida - 1 cup
Semolina / Rawa - 1/2 cup
Rice flour - 2 tbsp
Onion, finely chopped - 1/2 cup
Fresh coriander and some curry leaves, chopped  - 1/4 cup
Green chillies-  2 nos (or adjust to suit your taste)
Salt - to taste
Hot oil - 1/4 cup (to make the dough)
Water (preferably warm)- 2 tbsp (approx) - to make the dough
Some more oil - to deep fry the vadas


How To -

  • Mix Maida, rawa and rice flour together in a bowl. Add chopped onions and salt and sprinkle little water to get some moisture. 
  • After 5 mins, add chopped coriander, curry leaves, green chillies and pour hot oil and mix well to get a soft, pliable dough. Be careful and DONT use your hand because its HOT OIL (I burnt my fingers the first time I made Maa Laadu and learnt the lesson!) Use a stainless steel spoon instead!
  •  Add warm water, a few drops at a time to get the dough done. Let sit for 10 minutes.
  •  Grease your hands with oil (or use a baking sheet as suggested by Kalyani) and flatten a small ball (roughly of 1 inch diameter or slightly more) of the dough and make a disc (approx 3 inch dia).
  • This is now ready to be deep-fried in pre-heated oil and then the Vada is ready to be devoured!

Simply use your palm! That's mehendi design on my hands, btw!
  • Repeat the same step of making (kinda thick) discs with the dough and deep fry in batches of 2 or 3 depending on the capacity of your frying pan. I could fry just one at a time, as I used very little oil and the smallest pan I had (this is to reduce left-over oil that remains to be re-used!)
    • Check for temperature of oil before frying, by dropping 1/2 tsp of mustard or jeera into it; they should pop up and sizzle. If the oil is not hot enough, the vadas will absorb more oil than necessary and will be soggy! 
    • Keep in medium flame and fry the vadas, to ensure the dough gets cooked sufficiently. High flame will blacken the outside and leave the inside uncooked!
    • Flip sides when it turns slightly golden colored and let the other side get crisp.


  • Drain excess oil on kitchen tissues and enjoy these lovely Maddur Vadas with a cuppa hot masala chai! :-)


Crispy Maddur Vadas
Crispy Maddur Vadas on their way to BHW event!


And to MidWeek Fiesta @FoodCorner


Sunday, January 1, 2012

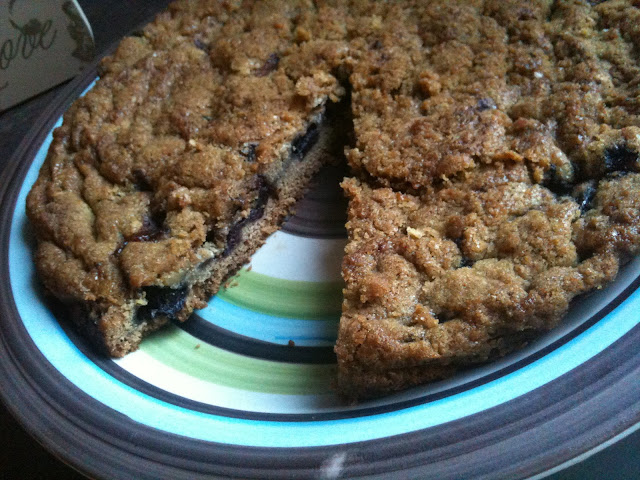
Blueberry Streusel Cake - Happy New Year!!!

I'm really fond of fruits in my cake and the berries, full of anti-oxidants, are definitely special! As a child, I haven't seen Blueberries or Blackberries and was fascinated to see some fresh produce here in Singapore! We do get Strawberries in India from places like Reliance Fresh or Nilgiris Supermarket and whenever appa brings home these cute fruits, amma makes fresh smoothies that taste so heavenly!

I am immensely delighted that this is my 100th post (Yeh!!!) and today is the 1st day of 2012 :) This is Celebration time! I decided to splurge a bit today and baked this one, without substituting butter with anything else! I did feel a bit guilty on creating some exceptions, but I guess we really enjoyed every piece of the cake :)

Blueberry Cake with Streusel Crumb Topping

The basic cake recipe is adapted from Joy of Baking, but the streusel topping is my own combination, with some oats and walnuts added for the crunch!

Blueberry Streusel Cake

What I Used for the Cake Batter -


Dry Ingredients -


All purpose flour - 1/2 cup
Whole wheat flour - 1/2 cup
Salt - 1/8th of a teaspoon
Baking powder - 1 tsp

Wet Ingredients -


Butter (unsalted) - 1/4 cup 
White Sugar - 1/2 cup
Flaxmeal - 1 tbsp soaked  3 tbsp of warm water for 5 minutes (or 1 egg)
Milk - 1/3 cup
Vanilla essence - 1/2 tsp
Blueberries - 350 grams

Blueberries - out of the freezer!

For the Streusel Topping -


All-purpose flour - 1/2 cup
Brown sugar - 1/2 cup
Cinnamon powder - 1 tsp
Walnuts (coarsely chopped) - about 10
Oats (Quick Cooking) - 1/4 cup
Butter - 3 tbsp


Steps -


To Make Streusel Topping -


Mix the flour, oats, cinnamon and sugar together. Cut in the butter with a fork and blend well until it forms coarse crumbs. Add chopped walnuts. This is the streusel topping. Keep it aside.

To Prepare the Cake Batter -


  • Sift the dry ingredients and mix them together.
  • Beat the butter until smooth and cream sugar along with it.
  • Whisk flaxmeal with warm water until it becomes sticky. Then, add it to the creamed butter-sugar mixture. Please look up this recipe for pictures of freshly ground flaxseeds and how it looks when whisked with warm water.
  • Add vanilla and beat until well-incorporated.

  • Now, add the flour mixture (dry) to the wet and add milk gradually and mix until just combined.
  • Take out your cake pan, grease with butter (or use a baking sheet as a liner) and pour this prepared batter on top of it.
  • Arrange blueberries on top of this batter.


  • Sprinkle the prepared streusel topping on top. Press slightly with a spatula.


Bake for 40 to 50 minutes until a toothpick inserted into the center of the cake, comes out clean, without anything sticking to it. Remove from the oven and let cool on the wire rack.


Blueberry Cake with Streusel Crumb Topping


The streusel crumb topping is the BEST part of this cake! It is ABSOLUTELY RICH with butter and sugar and the addition of oats and walnuts give it the much needed crunch :) I say, its so much better than cakes loaded with cream on top! Do try this and your taste buds will be soo pleased that you'll want to make it over and over again! :-)

Serve fresh out of the oven when it's still warm. Refrigerate the cake (if anything remains!) and it will stay good for a week.


Wishing everyone a fantastic new year filled with good health, joy and prosperity!!! :) 


Friday, November 25, 2011

Carrot & Pear Cake (Eggless and Vegan)

When I started baking, I had decided that I won't be using butter (and definitely not in cups and cups) in order to do good to myself, esp to feel good, when I stand in front of the mirror ;)  I also try to use whole wheat flour and avoid or atleast reduce the quantity of all-purpose flour/maida used. Wheat flour is bleached with a substance called Benzoyl peroxide (which is present in hair dyes and is banned in UK china and the European Union. OMG!!) to get white colored Maida. Source : Wikipedia

There are a lot of Carrot Cake recipes over the Web and sure, they all look delicious and tempting! This one caught my attention and I wanted to give it a try. The first time, I made these with an apple, as per the original recipe, just eggless. Simply delicious! Now, I had some pears in my fridge and I thought a pear can be substituted in place of an apple! Sure, they work great!  They are similarly textured and is almost of the same size. I also inserted some walnuts (but of course;) - you can add any nuts - pistachios, pecans or use 1/2 raisins and 1/2 nuts - entirely upto you!

Perfectly moist and full of carrots, this one is a healthy cake that also tastes super-yummy! :) Don't blame me if this cake becomes your tea-time obsession! :)

Carrot and Pear Cake

With the classic CreamCheese frosting!


I Used -

Carrots and Pear

1 cup  Whole-Wheat Pastry flour
1/2 cup Brown Sugar
1/2 cup White Sugar
2 tbsp Flax seeds, freshly ground
6 tbsp Warm Water
1/4 cup Olive Oil
1/4 cup Prune Extract (Or Use another 1/4 cup Oil or 1/4 cup Applesauce)
1/2 tsp Baking Soda.
1/4 tsp salt
1 tsp All-spice powder (use cardamom powder if you don't have all-spice)
2 medium carrots , peeled and grated (amounting to 1 and 1/2 cups)
1 medium pear (peeled and cut into small cubes)
Walnuts - about 8 nos.

Whole Wheat flour


How To -


Preparatory Steps -

  1. Grate Carrots
  2. Cut Pear or Apple
  3. Soak groound Flaxseeds in warm water for 5 minutes then whisk)
  4. Start pre-heating the oven to 180 deg Celcius


Procedure -


  • Combine flaxmeal,  oil, prune extract and the sugars until a bit creamy.
Ground flax seeds

It becomes a bit frothy after whisking with warm water

  • In another bowl, sift the flour, baking soda, salt and all-spice powder.
  • Gradually add to the wet mixture until just combined.
  • Fold in carrots and pear.
  • Mix in coarsely chopped walnuts.
  • Grease a square baking pan with oil or butter (if you don't mind!) and spoon the batter and level it.

Ready to go into the oven

  • Bake at 180 degree Celsius for about 30 minutes or until a toothpick inserted in the center of the cake, comes out clean.

Just out of the oven!

Cooled and turned upside down
Close-up!

  • Let cool and then make pieces.
  • Enjoy as such with a cuppa chai tea, like I did! :)

When you serve to guests, you could make a quick frosting with cheese cake, to make it decadent! You could place a walnut on top of each piece for decoration.

Carrot and Pear Cake with Cream Cheese Frosting


(To make the frosting, I used equal quantities of cream cheese and sugar, 1/4th of that quantity of butter and a few drops of vanilla - whisk them all together until and creamy and well-incorporated...Ummmm....:)

Notes:


  • Do not add more water than the prescribed ground flaxseed-to-water proportion (1 tbsp flax to 3 tbsp warm water). The end result will be sticky dough-like cake and longer hours of baking.The first time, I used flaxseeds, I added extra water and learnt this lesson the hard way! 

  • While grating carrots and particularly, apple or pear, strain extra juice if there's too much and do not add all the juice to the cake. For this reason, I prefer chopping pear or apple into small pieces (in lieu of grating). Best to not grate carrots fine (Use the bigger grater). This is to prevent the cake from turning overly moist.

This is on the way to Bake Fest @ Zesty Palette


and to Khushi's Bake With Your Heart even.

I'm very happy to send this cake to Christmas Party @ Julie's space - Erivum Puliyum


Saturday, October 29, 2011

Chivda Mixture - A Quick and Easy Snack

This is an easier version of the traditional Mixture where you have to make a hundred different things - Boondi, Aloo chips, Maida squares, Omapodi, Karasev -  before getting the final Mixture ready to eat. I  know Mixture is laborious neverthesless worth all the effort. But, Chivda is a great option when you wanna make huge quantities of a quick snack!  It's lite, cheap and easy to get your hands on, like a free version of a great iPhone app :)

You need Poha(Aval), Pori (Puffed rice), Cashews, Groundnuts/Peanuts, Roasted gram (pottukadalai) and may be some store-bought Sev ;). My mom used to make this during Summer vacation days as we were at home all day and wanted to munch something while watching TV!

Chivda - Easy mixture

Here's how she makes it...


Ingredients -


  • Poha(Aval or Flattened Rice flakes) - 2 handfuls (Use thin variety)
  • Pori (Puffed rice) - 4 handfuls
  • Sev/Omapodi - 200 g (I just bought a packet of Aloo Bhujia from grocery store, it cost me $1)
  • Cashewnuts - 100 g
  • Groundnuts/Peanuts - 150 g
  • Roasted gram (Pottukadalai) - 200 g
  • Roasted Moong  - 200 g (optional)
  • Salted pistachios - 150 g (optional)
  • Raisins - 50 g
  • Sugar - 1/2 tsp (optional)
  • Ghee - 1/2 tsp (optional, to roast cashews)


There is no hard and fast rule to the quantity of each ingredient; feel free to add more roasted gram or more cashews, if you love them :) 


Set A :
  • Oil - 2 tbsp
  • Black Mustard seeds - 2 tsp
  • Curry leaves - 2 twigs
  • Red chilli powder - 1 and 1/2 tsp (adjust to taste)
  • Turmeric powder - 1/2 tsp
  • Hing - a generous pinch
  • Aamchur / Dry Mango powder- 1/2 tsp
  • Garam masala - a generous pinch
  • Salt - to taste (adjust according to quantity of nuts that are pre-salted)


How To -


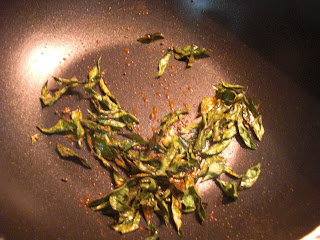
  • Take a big kadai/pan, heat oil and splatter mustard. Follow it with the ingredients listed in Set A. Fried curry leaves are utterly crispy and  soo good to eat!


  • First, add Thin Poha/Aval/ Flattened rice flakes and fry well in the spice-oil mixture. This step is important as, poha does not taste good, if raw!
Flattened Rice flakes / Poha getting fried

  • After 5-7 minutes, add peanuts and cashews and roast them too. Add a bit of ghee, at this point, if you like :) 
    • I bought roasted and salted cashews and peanuts, so added them as such. Also, I added puffed rice (Pori) and then the nuts.
    • You can roast peanuts with their skin on. It tastes better that way. Add some more oil, if necessary.
Puffed rice going next

Roasted gram (Pottukadalai) and Roasted peanuts

Roasted cashewnuts


  • Then, add Pottukadalai (Roasted Gram), Roasted Moong (I didn't have this) and Sev (optional, but nice to have). Add salted pistachios and some raisins, if you like. Toss everything well together. 

Raisins

Sev or Oma podi going in next

  • Check for salt.

  • Sprinkle sugar finally (and mix), if you like. I can see some of you showing faces at me at the mention of sugar! It's okay, sugar does add taste but it's purely optional, entirely upto you and what your family loves.

Chivda, ready to munch with coffee/tea


That's it! Chivda is ready! Store in air-tight containers. It stays good for 10 + days :)


LinkWithin

Related Posts Plugin for WordPress, Blogger...