Showing posts with label breakfast. Show all posts

Wednesday, June 3, 2015

Pidi kozhukattai - Best South Indian tiffin ever!


I have a special love for steamed foods, especially the kozhukattai kinds. I was craving to eat some and made this quick pidi kozhukattai as it doesn't require any special ingredients. 

This was our dinner tonight. It took me 20 minutes end-to-end to prepare this. Awesome, isn't it? 


Pidi kozhukattai with Onion thokku and Sambar

Ingredients:


Rice - 1 cup
Coconut - 1/2 cup

Tempering :


Oil - 2 tsp
Mustard -1 tsp
Channa dal - 1 tbsp
Curry leaves - 1 sprig
Green chillies-  3 , finely chopped
Red chilly -1
Asafoetida - 2 dashes
Salt - to taste (~1 tsp)

Method:


Wash and rinse rice as usual. Then take a pan, fry the rice as such (dry).  Stop when it starts becoming slightly reddish. Let cool and grind coarsely to a powder. This is typically called "rice rava".

Take a kadai, heat oil and do the tempering as given above.
Then add water and let boil. Rice rava to water ratio is 1:2.5
Add salt and coconut to the water.
After a minute or two, slowly add the rice rava and keep mixing. Ensure there are no lumps. Keep stirring.  In 2-3 minutes, all the water would have been absorbed. Test if the rice is cooked, if not, do add another 1/4 cup to 1/2 cup water and let it cook well.

Now transfer to a plate and allow it to cool , so you can handle it with your palms to make kozhukattai.

Steam in an idly cooker and switch off flame in 10 minutes exactly. Kozhukkattais are done :-)

Pidi Kozhukattai - South Indian tiffin


Enjoy with Onion Chutney and Sambar :- )

Wednesday, March 7, 2012

Kanjeepuram Idlis -Spicy cupcakes the South Indian way

I learnt about Kanjeevaram Idli from my grandma(dad's mom), who hails from Tiruvarur. She is one terrific cook! My mom also makes this at times, when we get bored of the regular idlis. The best part is that, these can be eaten as such (being spicy), without any side dish to go with. However I love mine with Puli Inji, a thickish sauce made with Ginger and Tamarind juice.

Kanjeepuram Idlis - Served with Puli Inji


Makes  ~ 12 Idlis


Ingredients -


Set A :
Idli Rice (short grain) - 1 and 1/2 cups
Urad dal - 1/2 cup
Channa Dal - 1/2 cup


Set B:
Ghee - 2 to 3 tsp
Cumin /Jeera - 1 tsp
Black pepper corns/ powder  - 1 tsp
Ginger (finely chopped ) - 1 tbsp
Hing / Asafoetida - a few drizzles
Curry leaves  - a few
Salt - to taste


Optional add-ons

Carrot (shredded )- 1/4 cup
Ghee-roasted cashews - a handful


Method -


Soak the rice and dals in set A for atleast 2 hours and then blend a bit coarsely into a batter, adding water as necessary.  Let ferment overnight (10 hours min).


I used half brown rice and half regular Idli rice and made them into Brown Rice Kanjeevaram Idlis.


Kanjeepuram Idli - basic batter


Fry the list in set B in ghee and then add to the batter and mix well. If adding carrots, add them without frying.


Pour into Idli moulds and steam as usual. You can also steam them into a single piece of a large Idli Cake (like we do for Dhoklas) and then cut them into squares.


Remember to grease the idli moulds with some ghee! Yummmy! :-)

Note to Beginners :  If you're using pressure cooker, don't use weight/whistle.

Hot from the steamer!   Kanjeevaram Idlis with Puli Inji


Give them to those who don't quite relish regular idlis which are bland on their own and I'm sure, they would like this  variation!  This also goes well with the tangy Tomato Thokku :-)

If you have the batter ready, it's just a matter of steaming the idlis and all it takes is about 15 minutes. Great for breakfast! :-)


Tuesday, February 14, 2012

Quinoa Salad - Quick, healthy and fulfilling breakfast/supper


What's Quinoa ?


Quinoa (pronounced "keen-wah") is a grain-like crop grown for its edible seeds. It's a highly nutritious carbohydrate, that helps you to stay lean as well as maximize your energy levels at the same time. Its nutritional profile is similar to that of brown rice, but quinoa is higher in protein. Quinoa is great for cardio-vascular health, boosts your anti-oxidant levels, reduces the risk of gallstones, full of fiber and could help lower migraine. It's gluten-free and cholesterol-free! Most importantly, it's delicious!


How to cook Quinoa ?


First, it is essential to rinse quinoa atleast 3 times by changing water, in order to get rid of the bitter taste from the saponin coating. It's cooked much like rice, with twice the volume of water (or slightly less). It can be cooked in a closed pan or a rice cooker or a microwave. When cooked, quinoa is fluffy, crunchy and a little creamy!


Here's a simple salad with veggies, fruits and nuts added to cooked quinoa. This is one of the quick ones I make whenever I want to stay away from Indian masalas, yet eat something tasty. Feel free to add or deduct veggies, fruits and nuts to suit your family's taste buds! :-)


Nutritious & delicious Quinoa salad - So easy to make!


Yield - 2 people


Prep time + cooking time - 25 mins


What I Used for the Salad-


Quinoa - 1 cup (rinsed)
Water - 1 and 3/4 cup
Olive Oil - 1 tsp


Onions - 2 (chopped)
Garlic -  4 pods, finely chopped
Carrot - 2 medium (cubed)
Cucumber - 1 (chopped)
Tomatoes - 3 (chopped)
Fresh Coriander leaves - a small bunch, finely chopped


Apple - 2, cubed
Raisins - about 50 grams
Cashewnuts - a handful
Hazelnuts - 2 handfuls

Salt - to taste
Pepper - 1 tsp
Asafoetida - 2 drizzles

Add ons :

Pine nuts - toasted
Peanuts - roasted
Strawberries - fresh!
Feta cheese! 


How To -

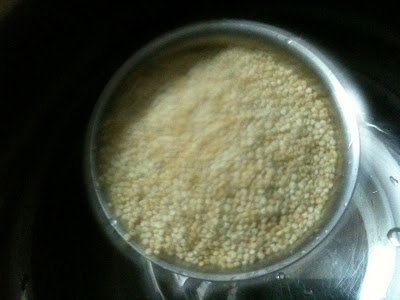
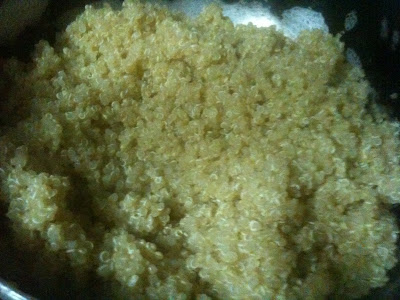
  • Boil water with a drop of oil in a pan. Meanwhile, rinse quinoa about 3 times to get rid of the foamy saponins. This step is important, else you'll end up with bitter-tasting quinoa. Add rinsed quinoa to boiled water and close the pan. In 12 to 15 minutes, it's fully cooked (all the water is absorbed) and looks fluffy with thin white rings around. Let the cooked quinoa cool for atleast 10 minutes.
 

Quinoa, rinsed with water


Cooked quinoa


  • Heat about 1 tsp of olive oil and fry garlic and onions slightly. Don't brown them. 

  • Toast the nuts on an oven or a tava without any oil.

  • Peel the veggies and chop them ready. Cube apples.

  • Take a big salad bowl, add the slightly fried onions, garlic and all the chopped veggies, apples, nuts, raisins and sprinkle required salt, pepper and a little asafoetida. Toss everything gently. Squeeze some lemon juice if desired.


Healthy n tasty Quinoa salad

Enjoy this sumptuous salad for breakfast or dinner!


Monday, February 13, 2012

Samba Godhumai Kichdi/ Broken Wheat/ Dalia Upma

The key difference between the more common Rava Kichdi/Upma (also called as Bombay Rava) and this one is that Samba Wheat does not require to be pre-roasted before cooking while normal Rava must be roasted first in order to avoid becoming sticky and pasty! So, that's the 1st plus point! Next, this upma would taste awesome even without much veggies (just onions would suffice)! All these make this a popular dish on one of those weeknights you're totally exhausted and jus wanna eat something humble from your own kitchen!

Broken Wheat aka Dalia is also a great substitute for rice if you're looking to shed off some extra pounds! A relatively smaller quantity makes you feel full, and it's full of fibre! That essentially means you burn more calories! Isn't that good news? Now that I've got your attention, let's jump to the recipe quickly! :-)

Broken Wheat/ Samba Godhumai/Dalia


This is amma's recipe, so its simple yet tasty!

Yield - 2 to 3 persons

Prep time  + Cook time - 20 minutes


You Need -

Dalia/ Samba Godumai/ Broken wheat - 2 cups
Water - 4 and 1/2 cups
Salt - as per your taste (about 1 and 1/2 tsp)

Tempering -


Oil - 1 to 2 tsp
Mustard seeds - 1 tsp
Channa Dal - 2 tsp
Ginger - 1 inch (finely chopped)
Green chillies - 4 nos. (slit longitudinally)
Dry red chillies - 2 nos (broken into 2)
Curry leaves - a few
Asafoetida / Hing - 2 drizzles


For added taste, add one of the two


Onions - 2 (finely chopped)
                 OR
Coconut (fresh, grated ) - 1 handful or a little more

How To -

  • Take a kadai, heat oil and let mustard seeds pop up. Then follow with rest of the ingredients and fry for 3 to 5 minutes. If you like onions, fry finely chopped onions at this stage.  Please skip the onions if you're planning to add coconut at the end.

  • Now, to the same kadai, add water and let boil. Add salt as well.  Note that turmeric is not added for this Upma.

  • Remember the ratio - For every cup of  broken wheat, add 2 and 1/4 cups of water.

  • Once water starts boiling, add broken wheat/ samba godhumai/ dalia  and cook covered until all the water is absorbed. 
  •  You could also microwave the whole thing - Transfer the tempering done into a large microwave-safe bowl, add water+broken wheat and cook for about 15minutes. The timing varies with the power of your microwave oven. Stir and cook until all the water is absorbed.

  • Finally add freshly grated coconut and mix well. This is optional and dalia tastes awesome if you've added either onions (initially) or coconut (finally).

Upma ready!

Amma served it with Mor kuzhambu/Pulisseri and it was yummy!

This goes well with any kind of Sambar or Chutney.


Friday, January 13, 2012

Ven Pongal / Kaara Pongal - Pongalo Pongal!!!

Ven Pongal or Khara Pongal is the salted version (Ven denotes its white (actually off-white) color) and is often made along with Chakra Pongal (sweet) on the day of Makara Sankrati aka Pongal festival.

I'm posting the recipe, well in advance, for the benefit of my friends, especially those who are trying this for the first time.  A lot of my friends got married last year and this is their first Pongal festival celebrated together with their spouse after their wedding; here's wishing them a joyful Thala Pongal :-) Hope you get inspired by the pictures to try Pongal in your kitchen too.

According to the tradition, we boil milk in a wide-mouthed vessel (a big one, decorated with turmeric bunch / manja kothu ) and right when it boils and is about to over-flow, there is a chorus "Pongalo Pongal" from the entire family after which we do Namaskarams  (prayers) and pray for all good things to happen in the following year! Pongal in Tamil means "over-flowing" and symbolizes an over-flow of cash/prosperity as well as happiness in the family.

Over to the method of preparation of Pongal -

Ven Pongal/ Kaara Pongal

You Need -


Rice - 1 cup
Moong Dal - 1/2 cup
Black pepper - 1 and 1/2 tsp
Cumin / Jeera - 1 and 1/2 tsp
Cashewnuts - about 12 to 15
Ginger, finely chopped or grated - 1 and 1/2 tsp
Curry leaves - a few 
Ghee - 1/4 cup (or a little more)
Salt - to taste (~1 tsp)


How To -


  • Rinse moong dal well by changing water about 3 or 4 times. Drain water completely and roast until its slightly reddish in color. (No oil required)


  •  Rinse rice thrice till water runs clear (almost).
  •  Boil 4 cups of water in a big pot (Ponga paanai) and then add the rinsed rice and roasted moong dal. When they are almost cooked, add salt and let it get slightly over-cooked (kozhaiya veganum). Finally, mash well using a potato-masher or any similar tool.
    • You can also pressure-cook rice and moong dal to get it done quickly. Actually, pressure-cooking (3 or 4 whistles) is better as it's easier to get a nicely mashed mixture.
    • I would like to add half-milk and half-water(just like for Chakra Pongal) to cook rice and moong dal to give it an enhanced taste.
  •  Next, coarsely powder jeera and pepper in an electric mixer or coffee grinder. 
  • Chop cashewnuts and ginger and keep them ready.
  • Take a deep kadai/wok, heat 2-3 tbsp of ghee and roast cashews first. Then, heat 2tbsp of oil and add pepper+jeera powder, let splutter and then add ginger. Fry for another minute and then add curry leaves. 


Tempering for Pongal


 Add the mashed rice+ dal mixture to the kadai and mix well. Add the remaining ghee, gradually, to prevent rice from sticking to the kadai.


VenPongal with Sambar and Onion Chutney

Serve with Gotsu or Sambar and any Chutney. Here's Onion Chutney and here's a quick Vegetable Chutney.

Notes :

Usually, I double the quantities of rice and moong dal (roasted) and pressure-cook them without salt. I use half of this for Ven Pongal and the other half for Chakra Pongal.


Sunday, January 1, 2012

Blueberry Streusel Cake - Happy New Year!!!

I'm really fond of fruits in my cake and the berries, full of anti-oxidants, are definitely special! As a child, I haven't seen Blueberries or Blackberries and was fascinated to see some fresh produce here in Singapore! We do get Strawberries in India from places like Reliance Fresh or Nilgiris Supermarket and whenever appa brings home these cute fruits, amma makes fresh smoothies that taste so heavenly!

I am immensely delighted that this is my 100th post (Yeh!!!) and today is the 1st day of 2012 :) This is Celebration time! I decided to splurge a bit today and baked this one, without substituting butter with anything else! I did feel a bit guilty on creating some exceptions, but I guess we really enjoyed every piece of the cake :)

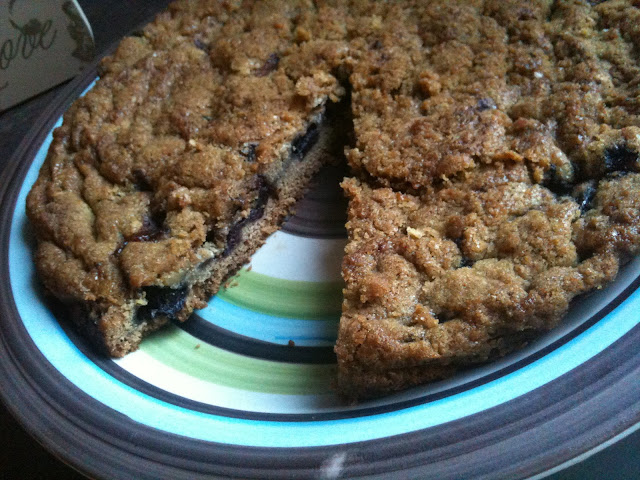
Blueberry Cake with Streusel Crumb Topping

The basic cake recipe is adapted from Joy of Baking, but the streusel topping is my own combination, with some oats and walnuts added for the crunch!

Blueberry Streusel Cake

What I Used for the Cake Batter -


Dry Ingredients -


All purpose flour - 1/2 cup
Whole wheat flour - 1/2 cup
Salt - 1/8th of a teaspoon
Baking powder - 1 tsp

Wet Ingredients -


Butter (unsalted) - 1/4 cup 
White Sugar - 1/2 cup
Flaxmeal - 1 tbsp soaked  3 tbsp of warm water for 5 minutes (or 1 egg)
Milk - 1/3 cup
Vanilla essence - 1/2 tsp
Blueberries - 350 grams

Blueberries - out of the freezer!

For the Streusel Topping -


All-purpose flour - 1/2 cup
Brown sugar - 1/2 cup
Cinnamon powder - 1 tsp
Walnuts (coarsely chopped) - about 10
Oats (Quick Cooking) - 1/4 cup
Butter - 3 tbsp


Steps -


To Make Streusel Topping -


Mix the flour, oats, cinnamon and sugar together. Cut in the butter with a fork and blend well until it forms coarse crumbs. Add chopped walnuts. This is the streusel topping. Keep it aside.

To Prepare the Cake Batter -


  • Sift the dry ingredients and mix them together.
  • Beat the butter until smooth and cream sugar along with it.
  • Whisk flaxmeal with warm water until it becomes sticky. Then, add it to the creamed butter-sugar mixture. Please look up this recipe for pictures of freshly ground flaxseeds and how it looks when whisked with warm water.
  • Add vanilla and beat until well-incorporated.

  • Now, add the flour mixture (dry) to the wet and add milk gradually and mix until just combined.
  • Take out your cake pan, grease with butter (or use a baking sheet as a liner) and pour this prepared batter on top of it.
  • Arrange blueberries on top of this batter.


  • Sprinkle the prepared streusel topping on top. Press slightly with a spatula.


Bake for 40 to 50 minutes until a toothpick inserted into the center of the cake, comes out clean, without anything sticking to it. Remove from the oven and let cool on the wire rack.


Blueberry Cake with Streusel Crumb Topping


The streusel crumb topping is the BEST part of this cake! It is ABSOLUTELY RICH with butter and sugar and the addition of oats and walnuts give it the much needed crunch :) I say, its so much better than cakes loaded with cream on top! Do try this and your taste buds will be soo pleased that you'll want to make it over and over again! :-)

Serve fresh out of the oven when it's still warm. Refrigerate the cake (if anything remains!) and it will stay good for a week.


Wishing everyone a fantastic new year filled with good health, joy and prosperity!!! :) 


Sunday, December 18, 2011

Aloo(+Methi) Paratha - Easy method for Beginners

Hello friends! Today's post is gonna be about a recipe which really boosted up my confidence that I can cook well too, back in the days I began experimenting in the kitchen.  I thought it's definitely a nice idea to share it with everybody and I hope this will motivate novice cooks to succeed. 

A picture speaks a thousand words! This is going to be a pictorial with lesser noise from me! :)

Potato-stuffed Parathas

Yield - 8 Stuffed Parathas


What I Used -


For the filling -


Oil/ Ghee/ Butter (or a combination)- 1 and 1/2 tsp
Omam / Ajwain/ Carom seeds - 1/2 tsp
Onion - 1  (chopped)
Ginger+Garlic paste - 1 tsp
Green chillies - 4
Potatoes - 2
Coriander-cumin powder (Dhania-Jeera) - 1 and 1/2 tsp
Turmeric - 1/2 tsp (or slightly less)
Kitchen king masala - 3/4 tsp (optional)
Salt - to taste
Fresh Fenugreek leaves (Methi) -  1 cup (loosely packed)

For the paratha dough -


Wheat flour - 4 cups
Warm water - 1/2 cup
Yogurt /Curd - 4 tbsp
Salt - to taste
Oil - 1 tsp

How To-


Paratha Dough - soft and pliable

  • I start with the dough so that it rests for a while and the filling gets made in the mean time.
    • Take a big mixing bowl, measure and add wheat flour (actually one gets a sense of the quantity by practice and if it happens to be in excess, you can always wrap the remaining dough in cling film and refrigerate to be used the next day).
    • Add salt and slowly pour warm water and start mixing the dough. When they have slightly come together, add yogurt and knead well. Yogurt helps to give softness to the parata. Knead well for about 3-5 minutes  and finally add oil and get a smooth dough. 
    • Cover the bowl with a lid and let rest for about 30 minutes. 

Let's make the filling now.  As usual, I have listed the ingredients in the order they go into the recipe.


Heat oil in a pan/kadai, add carom seeds then fry onions

Add ginger-garlic paste, fry for 2 mins, then green chillies (Oops! I used Red Chilli Padi that I had on hand)

Cook 2 potatoes in a pan with sufficient water and salt

Peel cooked potatoes and mash them

Add mashed potatoes to the pan, add the spice powders + salt

Mix well till everything comes together...

Stuffing for Alu Parathas

Finally, I added Fenugreek / Methi leaves because I had them in the fridge and wanted to use them while they were still fresh. For traditional Aloo Parathas, it's really nice to add some fresh coriander leaves/ cilantro.

Now to the most important part of stuffing the parathas and rolling them beautifully ...


The secret to getting stuffed parathas right, is now out!

  1. Take a small lemon-sized dough, roll it into a rather thin paratha (using a rolling pin).
  2. Take some filling and spread it evenly (without bumps) on the rolled out paratha with a spoon. 
  3. Roll out another plain paratha and place it on top of the first one that already has the filling spread on its surface.
  4. Once the two are super-imposed almost perfectly, seal the edges by tucking them and pressing them with your fingers. The dough being soft with stick to each other, just like that (Attraction of like molecules)!

Notes:


1. The two parathas that make up a stuffed paratha should be ~ of the same shape. It is likely that you'll get (more or less) the same shape if you start with the same quantity of dough for both.

2. This method applies for any stuffing - Paneer parathas, Cabbage parathas, Broccoli parathas and virtually anything you can imagine.

3. You need to let the prepared stuffing to cool sufficiently, before rolling parathas. When hot, they stick too much and could get messy! 

Secret #2

Any Stuffed paratha remains softer longer (and tastes a lottt better) than a plain paratha, even when prepared by someone inexperienced with the tricks of kneading a soft dough!

Although this method yields delicious parathas, some folks like their Alu Parathas better if they get to see some stuffing visible on the paratha itself. Now, this is a challenge (atleast to begin with) as you should show some filling but still cover it all up with a thin layer of dough. Here comes the

Traditional method -


This pic / step is the key. You can see that the filling is placed right at the beginning of the rolling process, when the paratha is still relatively thicker. Also, you make folds on the dough while trying to cover up the filling. This ensures there is sufficient dough to sorta protect the filling from spilling out of the covering when you roll it out.


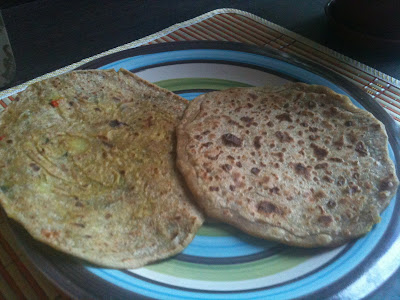
Cook the parathas on a hot tawa, as we do with any other paratha (please refer to Sweet potato paratha, Methi paratha for the detailed procedure and some tips).  Finish off with a drop of ghee!


When you compare the 2 methods(see pictures of both above), the first one (beginners' method) allows you to insert more filling per paratha. This is useful if you have a fussy child (or spouse;) who promises to go by the numbers and eat exactly 1 or 2 parathas only ! You can be assured they had a filling meal as you have stuffed a 'generous' portion of potatoes, which is full of carbs! You can also roll out a bigger circle to increase the quantity of intake but that's a very obvious change :)

Super-imposed parathas (Beginner method) - torn to reveal the filling inside!

Since the filling has all the required spice and salt content, this can be had as such and is ideal to be taken to your workplace (like a wrap) too. I try to buy a single-serve pack of flavored yogurt (preferably mixed berries) and give a finishing touch to my meal. When at home, I eat with raita (beaten yogurt with chopped onions and tomatoes spiced with salt and asafoetida)!


Wednesday, December 14, 2011

Methi and Spring Onion Paratha / Thepla - Indian Flat bread with fenugreek leaves and Spring onions

Fenugreek brings remarkable health benefits! Its seeds, leaves(both fresh and dried) is extensively used in Indian cuisine.

Fenugreek leaves helps increase the good-cholesterol levels (HDL-C), the seeds helps ease stomach aches and I've heard that fenugreek helps new mothers boost lactation capacity.

But be careful not to use too much of fenugreek as they leave a bitter taste in the end-product.

Methi Parathas / Teplas

What you need to make Methi Parathas / Teplas -

Fresh Fenugreek leaves

  • Methi / Fenugreek leaves/ Mendaya Keerai - 1 and 1/2 cups
  • Spring Onions - 1/4 cup (chopped) - Just my addition, you could skip if you do not have them in hand! They do add to the taste though.
  • Whole wheat flour - 4 cups
  • Green chillies - 2 (finely chopped)
  • Ginger (shredded) - 2 tsp
  • Coriander powder / Dhania - 2 tsp
  • Cumin + pepper powder (Milagu-jeera podi) - 3/4 tsp
  • Red chilli powder - 1/2 tsp (Adjust to your preference, according to the hotness of green chillies)
  • Omam (Ajwain seeds ) - 1 tsp
  • White sesame seeds - 1 tsp (Gives added flavor)
  • Turmeric powder - 1/2 tsp
  • Sugar - 1/2 tsp ( to counter the bitterness of methi)
  • Salt - to taste

  • Water - as required (~ 1 cup)
  • Oil - 2 tbsp
  • Yogurt / Fresh curd - 2 tbsp
  • Ghee - 2 tsp (optional)

How To Make the Dough -


  • First wash the fenugreek leaves (shake off excess water) and remove the leaves alone discading the stalk.


  • Take whole wheat flour in a big mixing bowl and add all the ingredients listed above, upto salt. Add water, in steps and mix everything together to form a dough.  Add yogurt as well. Keep kneading and bring all the flour together, adding water as and when required. Add oil towards the final stages and get a soft, pliable dough. Cover the bowl and let rest for an hour.

The dough is ready!


To Make Teplas -


  • Flour a clean, dry surface, take a lemon-sized ball of dough and roll it into a circle using a rolling pin (also floured). Sprinkle flour in between to prevent the tepla from sticking to the surface or the pin. Repeat until the dough is all used up. The quantities given yield about 12-14 teplas. 


  • Heat a tawa and place a rolled-out tepla on it. When the underneath surface starts to show brown spots (in about 10 seconds), flip it and press the corners with a flat wooden spatula. Flip again after 10 seconds and ensure the teplas are cooked well. Finish with a drop (or two) of ghee on each tepla for that enhanced taste! :-)


Store the teplas covered with aluminum foil in a keep-hot casserole.

Teplas are best enjoyed with Yogurt!

Serve with fresh yogurt (plain)/ curd. You can also make dal or any simple gravy to go with these. I can eat this for breakfast, lunch or dinner (of course, not all 3 times on the same day, too boring :P ).

Theplas stay good for about a week. I used to make a big batch of these on Sundays when I had exams the following weeks.You might want to heat them up again on a hot pre-heated tawa (microwaving doesn't yield great results according to me, unless you're gonna eat it immediately) before serving.


LinkWithin

Related Posts Plugin for WordPress, Blogger...